
Wordpress Speed optimization
Page Speed: Why It's Important!
Wordpress Speed optimization
Page Speed: Why It's Important!
According to research, users lose focus after 0.3 to 3 seconds of waiting. When your website does not display important information within that time frame, the user might lose focus and close the browser window.
A faster website will result in fewer bounces, more conversions, and higher positioning in organic search results.
A slow website will harm your brand. In contrast, improving the speed of your web pages will increase traffic, user engagement, and sales.
What Affects Site Speed
There are several reasons why your site might not load quickly. There are a number of possible causes, but the most common ones are:
➤ JavaScript and CSS are heavily used
➤ Server/hosting plan is poor
➤ Images with large sizes
➤ Browser cache is not being used
➤ There are too many widgets and plugins
➤ Using slow servers to hotlink images and other resources
➤ Traffic volume
➤ Older browsers
➤ Having a slow network connection (mobile devices)
There are a number of steps you can take to boost page speed, which I will explain later. Test your page load time before you start troubleshooting to improve website performance.
Find out more about page speed in our blog post about the key website performance metrics that can help you optimize your site.
How to Optimise Your Website Speed
Hosting providers, images, JavaScript and CSS files, and web fonts are some of the factors that can affect your website's speed. The following steps will help you optimize all these factors to get the fastest website possible. As a result of this list, a comprehensive optimization strategy will be formed.
1. Audit Your Site’s current performance
A performance audit is important before making any changes to your site's loading and handling of content.
To start, you can use a free tool like PageSpeed Insights. It will evaluate your Core Web Vitals on mobile (by default) and desktop and let you know if you passed. Additionally, it will provide a color-coded score reflecting your site's overall performance, along with suggestions for improving it.
You can also use other tools like GTmetrix and Pingdom Website Speed Test.
It is much easier to identify and implement key fixes if you have more data about how your site performs.
2. Prioritise Potential Fixes
It's tempting to fix everything at once once you've identified website speed issues. We wouldn't recommend this approach even if you had unlimited resources and time.
Try prioritizing potential fixes based on what matters most to your visitors. Consider server-side issues, such as hosting provider problems or DNS issues, if your site takes a long time to load. You should prioritize this even if your site's content is not delivering at speed - visitors won't stay if your page takes a long time to load.
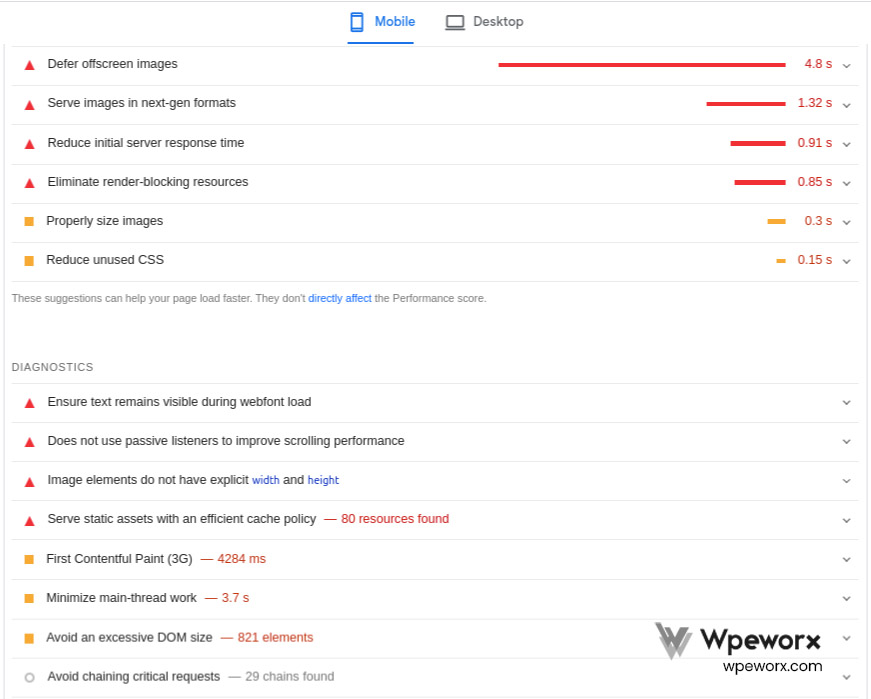
You can also prioritize your optimization efforts by using speed testing tools, like PageSpeed Insights. As an example, you would prioritize reducing main-thread work - the time spent parsing, compiling, and executing JS - over avoiding large layout shifts when looking at the list below.
3. Evaluate Your Current Hosting Provider
Hosting providers may be a potential source of speed issues, as noted above. Several factors can contribute to speed issues, including your provider's geographic location, physical infrastructure, and overall bandwidth of their network connection, but also the type of hosting your website is using.
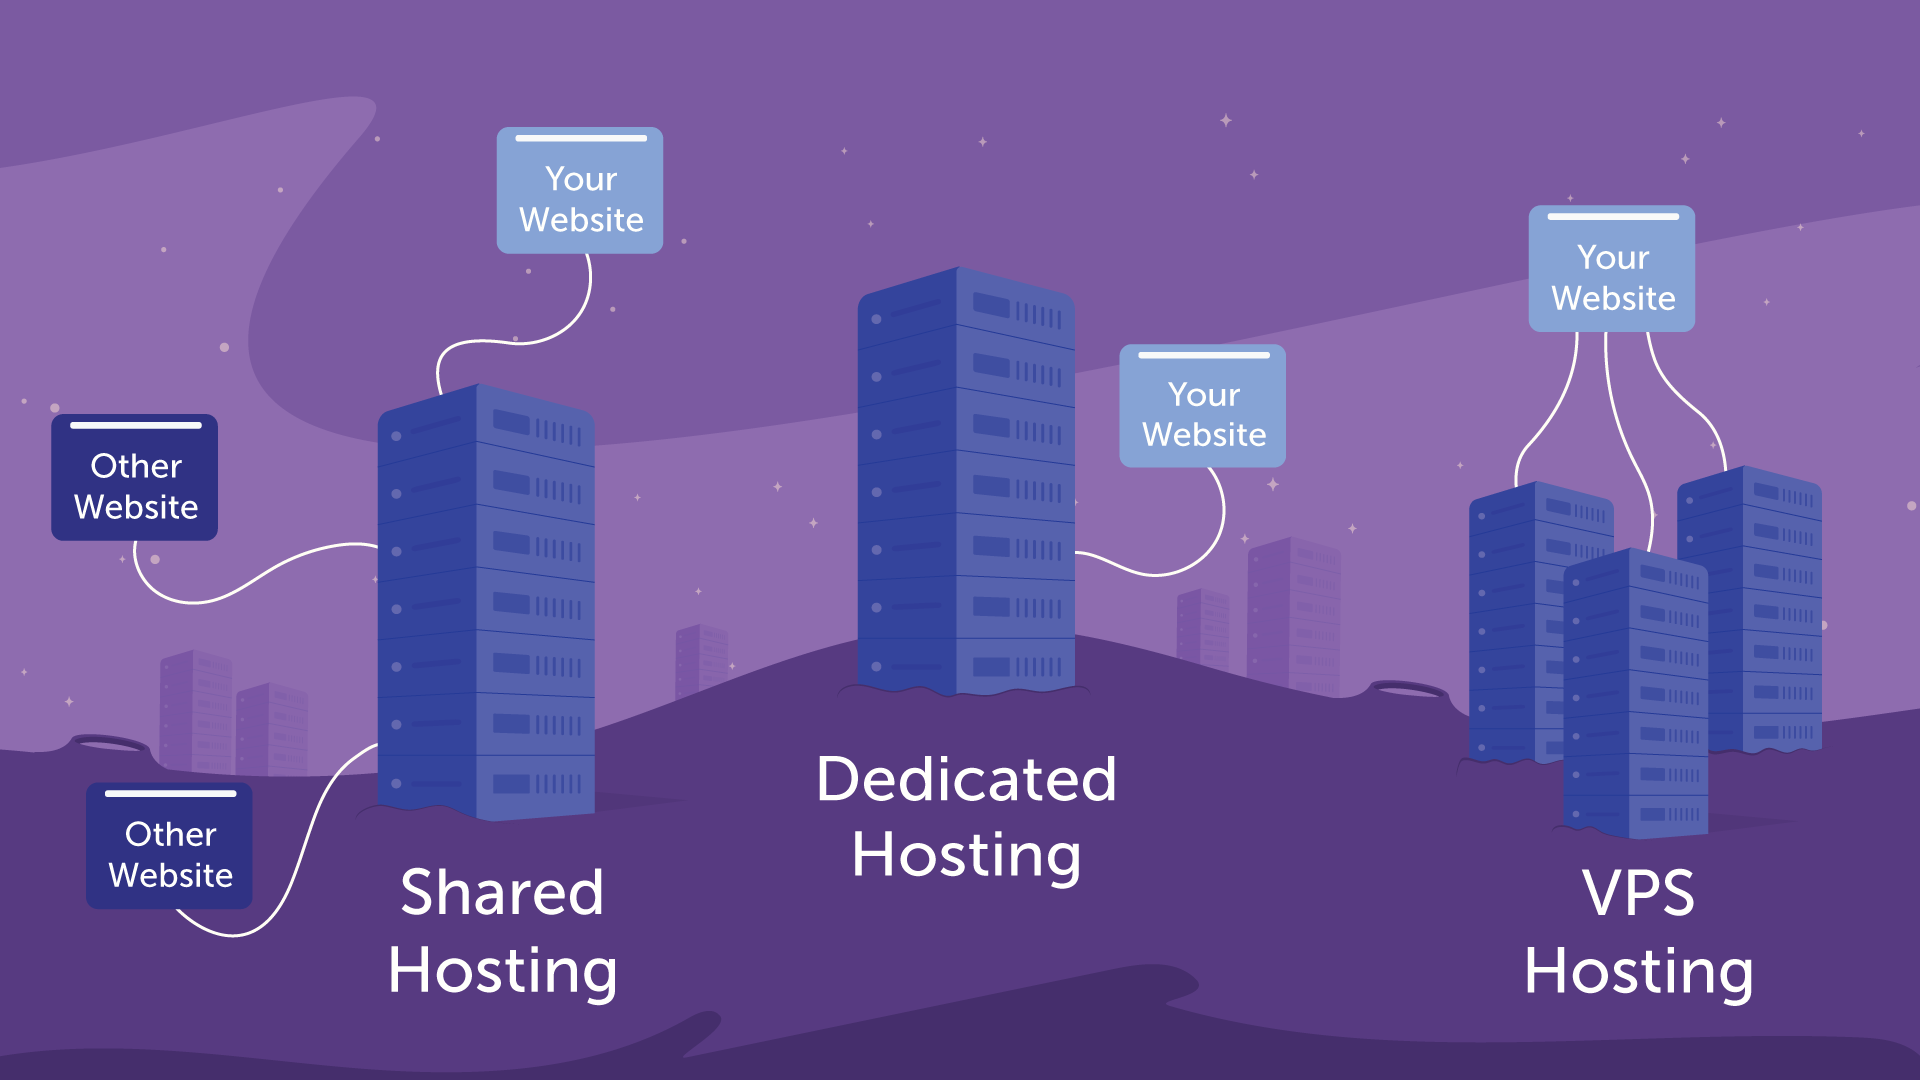
There are three types of hosting: shared, VPS, and dedicated.
3.1 Shared: The most cost-effective hosting option is shared hosting, which splits resources among multiple sites, resulting in poor performance. Your site may experience problems if there are spikes in traffic or if you have a constant high level of traffic.
3.2 VPS: VPS options logically separate services on a shared physical drive to improve performance, but still suffer from performance issues if resource loads are high.
3.3 Dedicated: Dedicated servers are more expensive than shared or VPS options, but will boost your speed significantly.
4. Consider a Content Delivery Network (CDN)
The longer your site takes to load in the beginning and throughout the day, the more data you need to store in one place.
Multiple servers are used to replicate your content across multiple locations. A CDN chooses the server closest to your visitors' physical location to deliver your content.
WordPress CDN solutions are listed below.
- Cloudflare
- StackPath
- Sucuri
- MetaCDN
- Site Accelerator by Jetpack
- Google Cloud CDN
- Microsoft Azure CDN
- KeyCDN
- Amazon CloudFront
5. Optimize Your Images
High-resolution images can make your site more engaging and memorable, but they can also slow down loading times.
HTTP Archive reports that the median image size on a desktop web page is over 1,000 KB (!).
It is possible to save precious weight and time by compressing these images before adding them to your website — many photo-editing programs offer options for optimising images for the web, but you can also compress common file types such as .JPG, .PNG, and .TIFF for free online.

Instead of running one of the image formats above through an image compression tool, you could use WebP. The format provides superior lossless and lossy compression for images. According to data from Google, WebP lossless images are 26% smaller than PNGs.
6. Reduce Total Redirects
You can use redirects to link high-ranking, high-traffic pages to newer content that you've created by sending users away from the page they've clicked on. A greater number of redirects means more load on the server, which can lead to a longer loading time.
It's worth using redirects initially in order to keep content views steady, but make sure to replace old redirects with new content as soon as possible in order to keep loading times short.
7. Limit HTTP Requests
Every HTTP request - for images, stylesheets, scripts, and fonts - slows down your site. You may notice a noticeable delay between the time the user clicks through and when the actual page loads on your website as the number of HTTP requests increases.
Using a CDN and minifying CSS and JS files, among other strategies, can help limit the number of HTTP requests your site makes.
8. Enable Compression for static resources
If you can reduce file sizes without compromising quality, your website will perform better. Gzip is one of the most reliable and robust compression frameworks, but other methods can also reduce file sizes without compromising the user experience.
According to data from W3Techs, over 88% of all websites use compression and almost 60% use Gzip specifically.
You should ask your web hosting service what type of compression they use. Gzip compression can be enabled by following this guide or choosing a new provider.
Apache Server (Add below code in your website’s .htaccess file)
<IfModule mod_deflate.c>
    # Compress HTML, CSS, JavaScript, Text, XML and fonts
    AddOutputFilterByType DEFLATE application/javascript
    AddOutputFilterByType DEFLATE application/rss+xml
    AddOutputFilterByType DEFLATE application/vnd.ms-fontobject
    AddOutputFilterByType DEFLATE application/x-font
    AddOutputFilterByType DEFLATE application/x-font-opentype
    AddOutputFilterByType DEFLATE application/x-font-otf
    AddOutputFilterByType DEFLATE application/x-font-truetype
    AddOutputFilterByType DEFLATE application/x-font-ttf
    AddOutputFilterByType DEFLATE application/x-javascript
    AddOutputFilterByType DEFLATE application/xhtml+xml
    AddOutputFilterByType DEFLATE application/xml
    AddOutputFilterByType DEFLATE font/opentype
    AddOutputFilterByType DEFLATE font/otf
    AddOutputFilterByType DEFLATE font/ttf
    AddOutputFilterByType DEFLATE image/svg+xml
    AddOutputFilterByType DEFLATE image/x-icon
    AddOutputFilterByType DEFLATE text/css
    AddOutputFilterByType DEFLATE text/html
    AddOutputFilterByType DEFLATE text/javascript
    AddOutputFilterByType DEFLATE text/plain
    AddOutputFilterByType DEFLATE text/xml
    # Remove browser bugs (only needed for really old browsers)
    BrowserMatch ^Mozilla/4 gzip-only-text/html
    BrowserMatch ^Mozilla/4\.0[678] no-gzip
    BrowserMatch \bMSIE !no-gzip !gzip-only-text/html
    Header append Vary User-Agent
</IfModule>
Nginx server (Need to add code in your site config file)
gzip on;
gzip_comp_level 2;
gzip_http_version 1.0;
gzip_proxied any;
gzip_min_length 1100;
gzip_buffers 16 8k;
gzip_types application/atom+xml application/javascript application/json application/ld+json application/manifest+json application/rss+xml application/vnd.geo+json application/vnd.ms-fontobject application/x-font-ttf application/x-web-app-manifest+json application/xhtml+xml application/xml font/opentype image/bmp image/svg+xml image/x-icon text/cache-manifest text/css text/plain text/vcard text/vnd.rim.location.xloc text/vtt text/x-component text/x-cross-domain-policy;
gzip_disable "MSIE [1-6].(?!.*SV1)";
gzip_vary on;
9. Capitalise on Caching
Using caching, your browser can load some of your content ahead of time, thus speeding up the delivery of your website. A content management system (CMS) will automatically cache the latest versions of your site, but you can also extend this caching timeframe. Content that doesn't regularly change on your site, such as:
- Logos
- Static images
- Downloadable files
- JavaScript files
- Stylesheets
Consider installing a caching plugin if your CMS doesn't offer this feature.
Here are a few free and premium caching plugins:
10. Track 404 Errors
It's unlikely that visitors will return to your site again once they've run into 404 errors, which means you've lost a potential customer. To solve 404 errors, run free, external tools to find and remove dead links.
If you are using ManageWP then you can use their Link Monitor add on.
You can also use Chrome tool to detect 404 urls on your website
11. Make Mobile a Priority
Increasing numbers of users use mobile devices for browsing and shopping, so mobile sites must be fast.
You can display your desktop site on mobile devices and hope for the best, but this often results in slow load times and interactivity problems. The development of a mobile-native website will maximize loading speed and improve response time.
12. Migrate to a CMS
Using a website builder can be a great way to quickly create and customize a website. But it may lack the infrastructure and features to handle complex issues, such as slow load times. Consider migrating to a CMS if you do not have the time, resources, or experience to implement all the optimization strategies in this guide.
Content management systems improve website performance by streamlining content retrieval and providing robust options for modifying site operations. There are even some that come with a built-in CDN.
13. Combine JavaScript and CSS Files
A website's JavaScript and CSS files are among its largest files. Additionally, they count as individual HTTP requests. In total, 10 HTTP requests would be required to download five JS files and five CSS files.
You can reduce your site's loading time by combining sets of JavaScript or CSS files if you know how to develop websites.
WordPress plugins such as WP Rocket, Autoptimize make this possible with just a few clicks, but whether you dive into code itself or use a CMS, it’s worth considering file combination to increase total speed.
14. Minify JavaScript and CSS files
Minifying your CSS and JavaScript files is another way to reduce their size. The technique involves removing any unnecessary code, such as:
>> Extra semicolons, line breaks, and white space characters
>> Functions and variables that are unused
>> CSS selectors that could be shortened
For page optimization, minification has become standard practice. Minified versions of all major JavaScript libraries (bootstrap, JQuery, AngularJS, etc.) are usually denoted by the min.js name extension for production deployment.
Using a minification tool or manually is an option.
Here are some online tools.
15. Determine Your DNS Speed
When your domain name server (DNS) takes a long time to respond, your time to first byte (TTFB) is longer and your site loads slower.
Online tools can help you determine how your DNS provider ranks against others, which helps you pinpoint specific problems.
Is it worth noting? Hosting providers sometimes provide DNS services as well, while others do not.
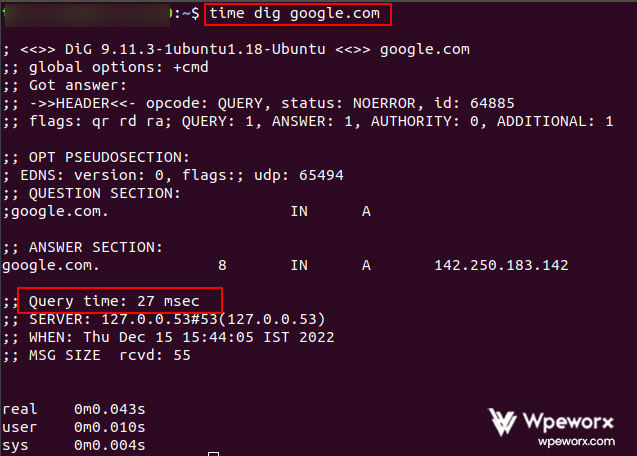
An easy way to test DNS server response times is to use dig
You must test DNS response time from other locations to get more accurate results. The DNS response time results show just one metric from your computer run further tests using Google’s Public DNS.
You can run a DIG command and DNS response time test on your Mac by opening the Terminal application in your Applications folder.
Go to Start > Run, type "cmd" (without the quotation marks), and press Enter. To open Command Prompt, click on it.
Then type the following command, replacing "your-site.com" with your actual domain name before pressing Enter:
time dig example.comEnsure that your site's domain is the correct one before pressing Enter.
This is a similar result to the DNS response time test performed for Google shown below. Real-time data is recorded in minutes, seconds, and milliseconds during the testing process.
When your computer executes the command, the query time is recorded, while real-time is measured by how long it takes for your computer to contact your site's DNS.
16. Opt for Asynchronous Loading
Your website loads most files and functions synchronously, which means they're loaded in the order they appear on the page - elements will only load once the script or service immediately before them has loaded.
Fortunately, many CMS platforms support asynchronous loading, which allows CSS and JavaScript elements to load simultaneously.
17. Choose Fewer Fonts
Web fonts can make your site stand out from the crowd, but can also negatively impact performance, especially if they are uncommon or require a unique character set.
Optimize fonts for speed and use fewer fonts to maximise page loading speed.
18. Pinpoint Poor-Performing Plugins
Identify performance-sapping plugins (also known as add-ons or extensions). However, plugins can negatively impact website performance, especially if they load a significant amount of assets or perform large database queries. In this case, the speed rule is simple: Only keep the plugins you need and always deploy the latest, fastest versions. If you run a WordPress website, this is especially important.
19. Add Expires Headers
In the .htaccess file of your site, you can add expires headers to speed up loading times for return visitors. In this type of HTTP header, the browser indicates how long it will take for cached copies of site resources to expire so that it can decide whether to serve them from the cache or request them from the server.
There are two reasons why expires headers are important. By doing so, they reduce server load and load time, while also preventing outdated resources from being served to visitors, which could have negatively affected the user experience.
Apache Server (Add below code in your website’s .htaccess file)
<IfModule mod_expires.c>
	ExpiresActive On
	# Images
	ExpiresByType image/jpeg "access plus 1 year"
	ExpiresByType image/gif "access plus 1 year"
	ExpiresByType image/png "access plus 1 year"
	ExpiresByType image/webp "access plus 1 year"
	ExpiresByType image/svg+xml "access plus 1 year"
	ExpiresByType image/x-icon "access plus 1 year"
	# Video
	ExpiresByType video/mp4 "access plus 1 year"
	ExpiresByType video/mpeg "access plus 1 year"
	# CSS, JavaScript
	ExpiresByType text/css "access plus 1 month"
	ExpiresByType text/javascript "access plus 1 month"
	ExpiresByType application/javascript "access plus 1 month"
	# Others
	ExpiresByType application/pdf "access plus 1 month"
	ExpiresByType application/x-shockwave-flash "access plus 1 month"
</IfModule>
Nginx server (Need to add code in your site config file)
location ~*  \.(jpg|jpeg|png|gif|ico|pdf|ttf|woff|svg|woff2|webp)$ {
		expires 365d;
}
location ~*  \.(css|js)$ {
	expires 365d;
     add_header Cache-Control "public, no-transform";
}
20. Database optimization
Optimizing databases can increase performance. Content management systems (CMS) with complex plugins increase the database size of your website. The WordPress CMS, for example, stores comments, blog posts, and other information that takes up a lot of storage space. In addition, each CMS has its own optimization measures and plugins.
Disabling and limiting post revisions and deleting old revisions are ways to keep your database clean.
When you write on WordPress, you make many revisions. Your database can end up with thousands of unnecessary revisions if you aren't careful.
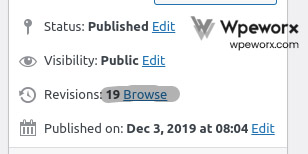
You can either disable revisions altogether or limit the number of revisions.
Disable WordPress revisions
In your wp-config.php file, add the following code to disable WordPress revisions. This changes the autosave interval from 60 seconds to 5 minutes, and then disables post revisions. Posts still autosave by default.
define('AUTOSAVE_INTERVAL', 300); // seconds
define('WP_POST_REVISIONS', false);
There is also a free plugin called Disable Post Revision which will do the above for you without having to modify any code.
Limit number of WordPress revisions
The following code needs to be added to wp-config.php to limit WordPress revisions. As a result, the autosave interval is changed from 60 seconds to 5 minutes, and the number of post revisions is set to three. Depending on your preferences, you can store as many revisions as you like.
define('AUTOSAVE_INTERVAL', 300); // seconds
define('WP_POST_REVISIONS', 3);
Delete old WordPress revisions from your database
After you have disabled or limited your post revisions, you should also clean up and delete old revisions. We recommend temporarily installing the free WordPress plugin WP-Optimize.
This plugin allows you to clean all post revisions, clean auto draft posts, remove spam comments, unapproved comments, transient options, pingbacks, and trackbacks. With the latest version of WP-Optimize, you can also schedule automatic cleanups.
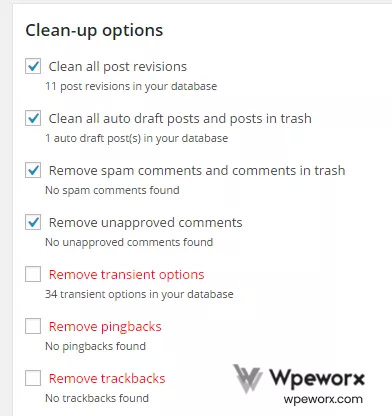
Last but not least, review your database tables. You should remove unnecessary/unused tables from your database. Even after removing plugins, tables can remain unchanged.
21. Use prefetching techniques
Prefetching involves reading and executing instructions before the user initiates them. Techniques like this are quite common. It works well if you can anticipate user actions and, for example, load some content or links in advance. Usually, modern browsers allow for prefetching by default as they assume user behavior patterns. UX specialists and engineers, however, are more likely to understand user behavior and provide “hints” for browsers to do prefetching work.
Prefetching can be divided into three types:
DNS-prefetching: This involves resolving domains into IP addresses in advance.
Link Prefetching: This type of prefetching is useful if you know a user will click a specific link to navigate to a specific page. This method is useful for stable user journey actions, such as moving to the shopping cart page after adding an item or several items.
You can prefetch domains in WordPress by adding the domain syntax to your header.php file between the <head>``</head> tags. This process is non-blocking and will only be performed when possible. Here are some common examples.
Prefetch Google Fonts
<link rel="dns-prefetch" href="//fonts.googleapis.com">
Prefetch Google code (jQuery)
<link rel="dns-prefetch" href="//ajax.googleapis.com">
Prefetch Google Analytics
<link rel="dns-prefetch" href="//www.google-analytics.com">
Prerendering: Prerendering a page or some elements of it in advance. In order to make precise assumptions about user behavior, prefetching requires deep user behaviour analysis.
22. Remove query strings from static resources
Some proxy caches and CDNs may cause caching issues if query strings are included in your static resources. WordPress offers a couple of options.
- Include a function to remove query strings in your functions.php file.
function _remove_script_version( $src ){
    $parts = explode( '?ver', $src );
    return $parts[0];
}
add_filter( 'script_loader_src', '_remove_script_version', 15, 1 );
add_filter( 'style_loader_src', '_remove_script_version', 15, 1 );- Using W3 Total Cache, an option can be unchecked to prevent query strings from being created. By navigating to the W3 plugin Performance tab > Browser Cache, you will find this option. In the General section of this page, there is an option called "Prevent caching of objects after settings change".
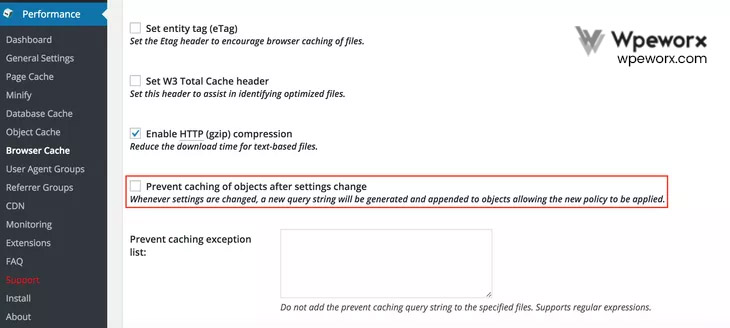
By default, this option is deselected, but if for any reason it is enabled, deselect it and save your settings.
23. Remove / Replace outdated plugins.
Check the last time the plugins on your site were updated before auditing them. Your WordPress plugin page will show a warning if it has been a while.

As these are likely no longer maintained, it is recommended to avoid them as they may cause performance or compatibility issues. In addition, when analyzing the impact on loading times, ask yourself if you really need the plugin or if you could accomplish the same task in another way.
24. Check for total orphaned postmeta (cross check table prefix before run)
SELECT COUNT(pm.meta_id) as row_count FROM wp_postmeta pm LEFT JOIN wp_posts wp ON wp.ID = pm.post_id WHERE wp.ID IS NULL;Delete the orphaned postmeta if counter is greater than 0 from above query
DELETE pm FROM wp_postmeta pm LEFT JOIN wp_posts wp ON wp.ID = pm.post_id WHERE wp.ID IS NULL;25. Lazy load your content, especially images.
Lazy loading is also an option if your WordPress site has a lot of images. Lazy loading only loads the images that appear in the user's browser window when the page first loads, and defers loading the rest until the user scrolls down the page.
When lazy loading is enabled, your content loads gradually instead of your browser doing all the loading work at once, giving the impression that the page is loading faster. In addition to images, lazy loading can also be applied to other media like video embeds and text.
For images, iframes, and videos, you can use the Lazy Load by WP Rocket plugin.
26. Don’t host videos on your server.
Above, I did not mention “videos,” but “video embeds.” Videos are one of the most resource-intensive files you can store on your web hosting server. When loaded, they consume a lot of space and can significantly slow down your site. Even storing one video on your server can affect performance.
You shouldn't abandon videos entirely, though. Videos are a great way to engage visitors. Use YouTube, Vimeo, or Wistia instead of your media library to host videos. All you need to do is embed the video on your page, and these services handle the storage for you. It makes no difference to the visitors (they’ll still see the same video), but your user experience will improve a lot.
27. Turn off pingbacks and trackbacks.
When you link to external websites in your site's content, you use WordPress' pingbacks and trackbacks technologies to alert those websites.
In the case of a link to hubspot.com in your blog post, you can configure WordPress to notify hubspot.com that you've linked to their website. It also works the other way around - if someone links to your site, you are notified.
In addition to letting other sites know that you value their content, pingbacks and trackbacks can result in backlinks.
However, many WordPress experts agree that the cons outweigh the pros. As a result, they are a source of spam and DDoS attacks because they use server resources unnecessarily. You can track backlinks using an external analysis tool, and there are plenty of other ways to earn backlinks to your site.
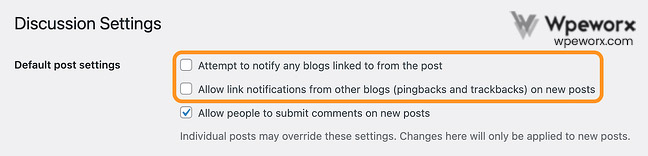
To make a long story short, we recommend you disable pingbacks and trackbacks. In your dashboard, go to Settings > Discussion and uncheck the first two options, Attempt to notify... and Allow link notifications...
28. Limit external scripts.
Your website uses external scripts, which are not stored on your own server. The scripts are commonly used in third-party analytics tools like Google Analytics and Crazy Egg, ad networks such as Google AdSense, and social media embeds such as "click to tweet." External scripts are also used to load JavaScript, CSS, and other media in many WordPress themes.
The use of external scripts isn't always a bad thing. To use the tools you want, you'll probably need at least a couple on your site. Be sure to weigh the pros and cons of adding plugins and tools that use external scripts and decide if the added functionality is worth the performance hit.
29. Enable Hotlink Protection
To optimize WordPress performance, many of these tips require you to make changes to your own website. Hotlinking, however, is someone else's fault.
Hotlinking occurs when one website uses a resource hosted on another website. Whenever another site hotlinks your resource, they display it on their site without the cost or performance of hosting the content themselves.
For example, I want to include an infographic from another website in my blog post. Ideally, I should download the image, upload it to my server, and cite the image source appropriately. I would link to that file as the source of the image and load it from their website if I hotlinked the image (which is the wrong thing to do).
- Protect hotlinks with a CDN
- You need to add code to your .htaccess file
RewriteEngine on
RewriteCond %{HTTP_REFERER} !^$
RewriteCond %{HTTP_REFERER} !^http://(www\.)example.com/.*$ [NC]
RewriteRule \.(gif|jpg|jpeg|bmp|zip|rar|mp3|flv|swf|xml|php|png|css|pdf)$ - [F]
Note: Don’t forget to change example.com with your own domain.
- The right click function should be disabled.
- You can add a watermark to your images.
30. Paginate comments.
WordPress loads your comment section on the page just like your main content, even though you might not think of it as site content. Paginating your comments can save load time if your comment sections are particularly active. By separating comments from the original post, you give the original page less content to load, allowing readers to leave comments only if they wish.
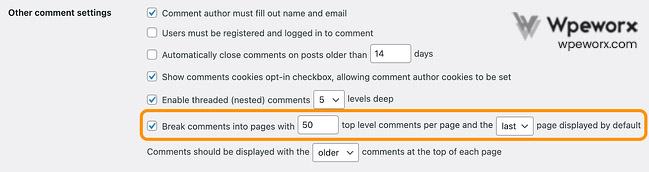
WordPress allows you to paginate your comment section easily: navigate to Settings > Discussion, check the box next to Break comments into pages..., and set the number of comments per page (50 by default).
The faster, the better.
Your bounce rates will be lower and your conversion rates will be higher if your website loads, displays content, and responds to user input quickly.
Related Posts
Back up & restore
Regular WordPress backups are essential for protecting your website from hacking, data loss, server failures, and other unexpected issues. This guide explains why backups matter and how to keep your site safe with a reliable backup strategy.
Setup & Install
Installing WordPress is a quick and straightforward process that usually takes just a few minutes. Follow these simple steps to set up WordPress on your website and get started with building your site.

WordPress Multisite
WordPress Multisite: What It Is, How to Activate and Manage It
Difference between various hosting types
Every website runs on a server, and web hosting gives you the server space and resources needed to make your site accessible online. Learn how web hosting works and why it's essential for building and maintaining a website.