
Back up & restore
Regular WordPress backups are essential for protecting your website from hacking, data loss, server failures, and other unexpected issues. This guide explains why backups matter and how to keep your site safe with a reliable backup strategy.
Steps to Take Manual Backup and Restore for Your WordPress Site
WordPress has made it easy to make a blog or set up a website for anyone with its simplicity and ease of use. It can sometimes fool you into thinking that you're secure. Keeping a fresh backup of your website is one of the most important things you can do to make sure your website runs smoothly. The fact that all websites are vulnerable to hacking, DDOS attacks, data theft, and data loss cannot be overstated. It doesn't matter how secure your website is, you are susceptible to any of the above threats.
When Might You Need to Restore WordPress From the Backup?
You don't have to restore your website very often, but when you do, you should do it correctly. Occasionally, you may need to restore WordPress from a backup:
- Your website has been damaged by a plugin or theme update.
- You get your website hacked and your database and/or files corrupted.
- In the end, you prefer the original version of your website over the one you redesigned.
- Your website's functionality breaks after you make significant changes.
Using a staging WordPress site before changing your live WordPress site can mitigate some of these issues.
What Is the Best Way to Back Up a WordPress Site?
WordPress sites can be backed up in several ways. Plugins can be manual, free, or paid. Making the right choice means paying attention to what you value most.
Manual WordPress Backups
You must manually back up your WordPress site every day if you choose manual backups. Backups of the latest version of your website provide a comprehensive, complete backup. This option is time-consuming, and human error is possible, so you might accidentally save an incomplete copy of your website. (In the next section of this article, we'll explain how to manually back up your site, so you'll know what to do.)
Paid Plugins for WordPress Backups
Everything can be done with a plugin. Unsurprisingly, there's a backup option for WordPress sites. Businesses looking to save time might benefit from a paid plugin for WordPress backups. One of the advantages of this process is that it is more straightforward and efficient. A paid plugin will likely protect your entire site, unlike free backups that sometimes only protect a fraction of it. This has the disadvantage of adding to your overhead plugin.
Free Plugins for WordPress Backups
WordPress backups are easier and faster with plugins. When businesses don't have the time or resources to manually back up their content, a plugin simplifies the process. There is, however, a limit to how much data is collected by most free plugins. It may result in only your database being captured, not your media files or themes. It is best to back up the site manually or to use a paid service to prevent this from happening.
How to Complete WordPress Backups Using a Plugin
It's still not possible to create a backup of your current website with WordPress, regardless of its many features. This is where WordPress plugins come in handy. With these software bits, you can add useful functionality to your website without having to write any code.
Among the many WordPress backup plugins available, UpdraftPlus WordPress Backup Plugin is the most popular. Check out our comprehensive guide to WordPress backup plugins if you're looking for other options.
In order to complete a WordPress backup using a plugin, you'll need to follow these steps:
- First, log into your WordPress dashboard.
- Navigate to the Plugins tab. Then click the Add New button.
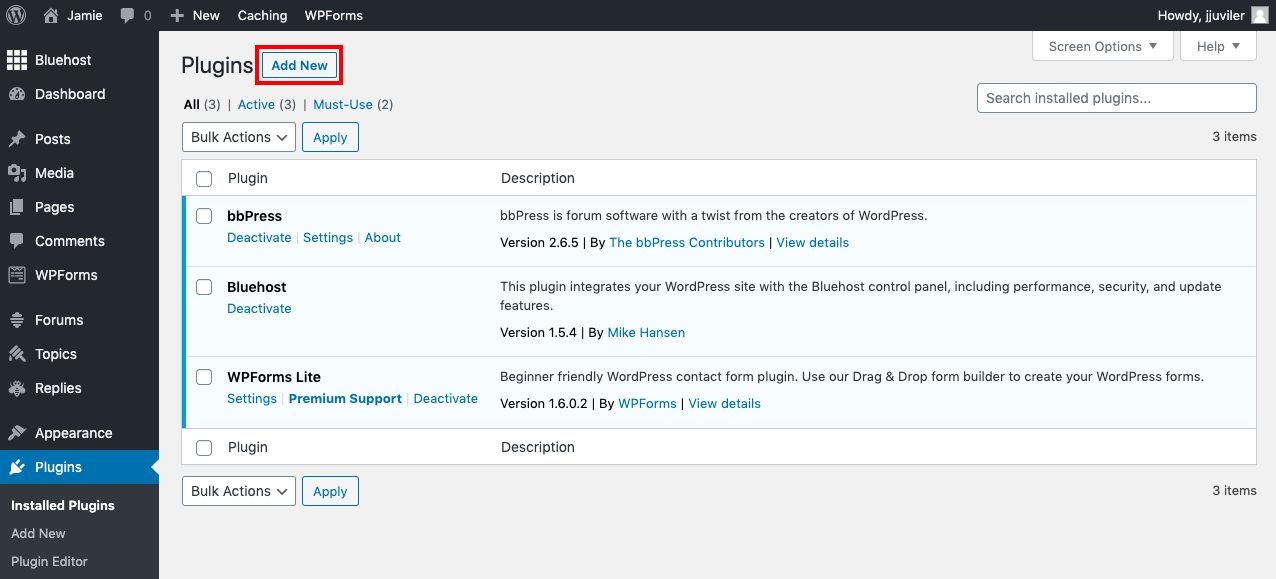
- When "UpdraftPlus" appears in search results, click Install Now.
- You will automatically be redirected to the tab listing all the plugins installed on your site once you click Activate.
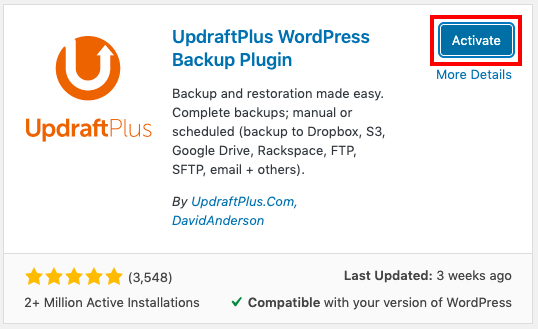
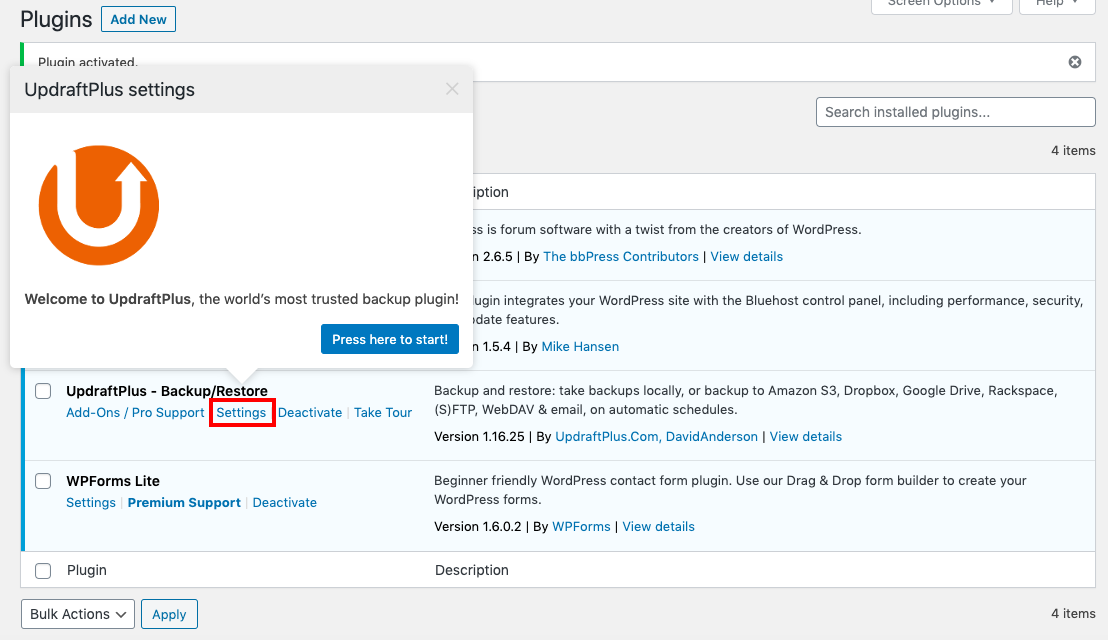
- It's time to configure the plugin's settings. A pop-up window might appear with a Start button! Click the Settings link if you don't.
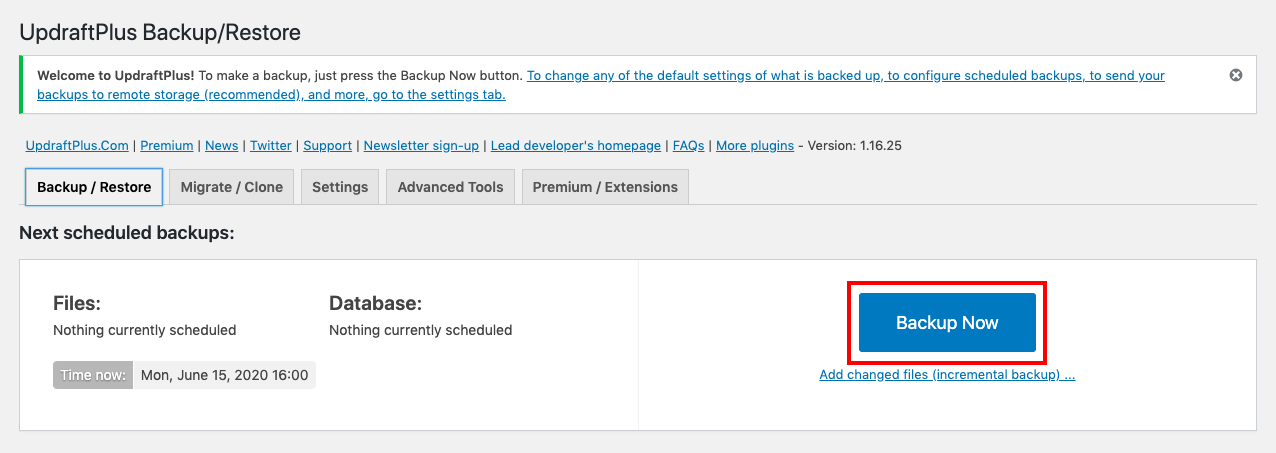
- Click the Backup Now button if you want to perform a backup immediately.
- Your backup schedule can be set under the Settings tab if you'd like to schedule auto backups.
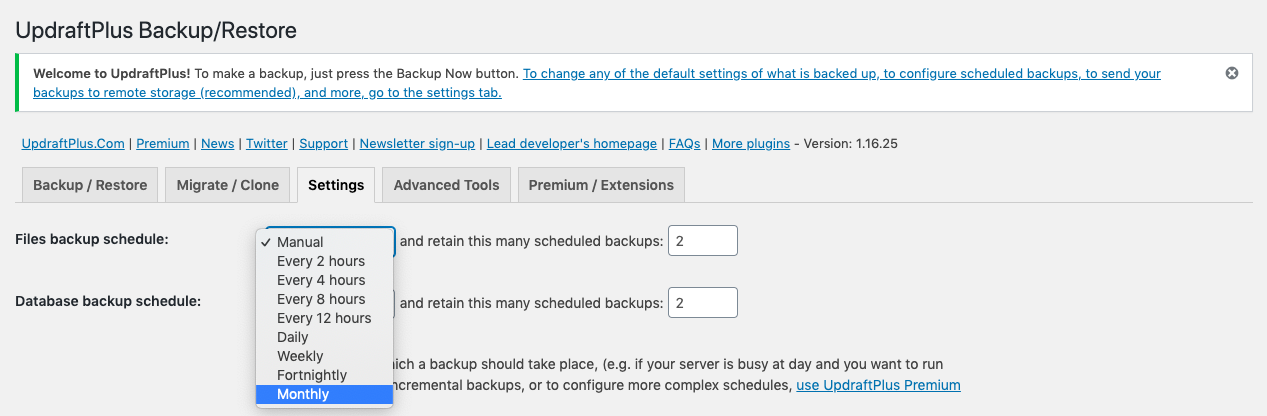
- Next, choose a remote storage provider to save your backups. Dropbox will be used for this demonstration.
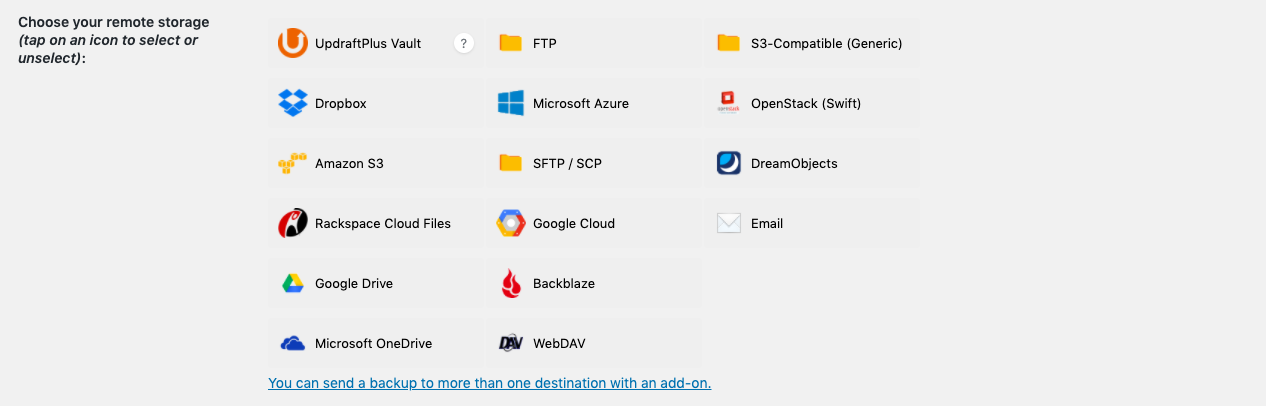
- As soon as you save your settings, a new section will appear with a link to authenticate your account with the provider. Currently, no action is required.

- You can select which files you want to back up.
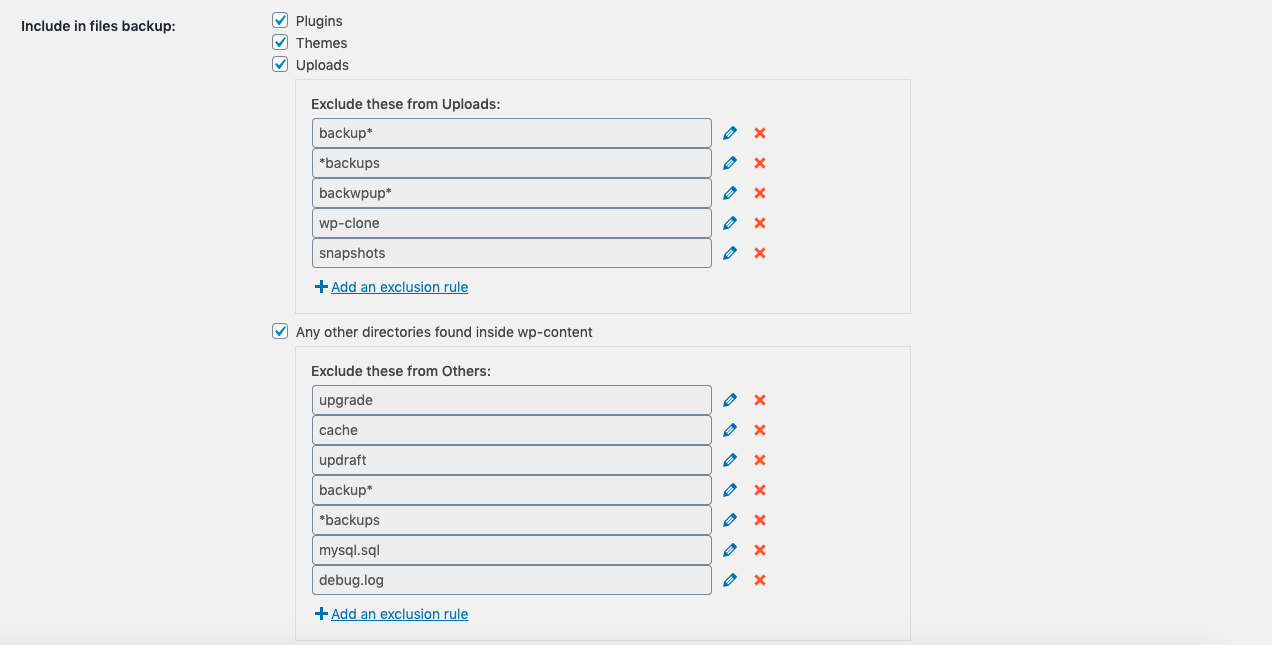
- Click the Save Changes button to save your settings.
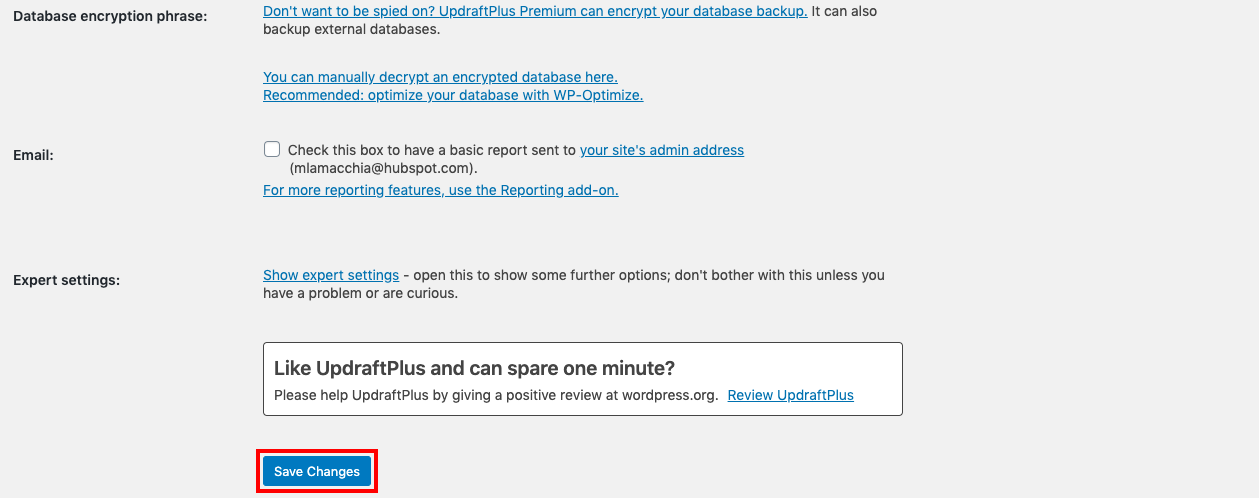
- The remote provider you chose will prompt you to verify your account once you click Save Changes.
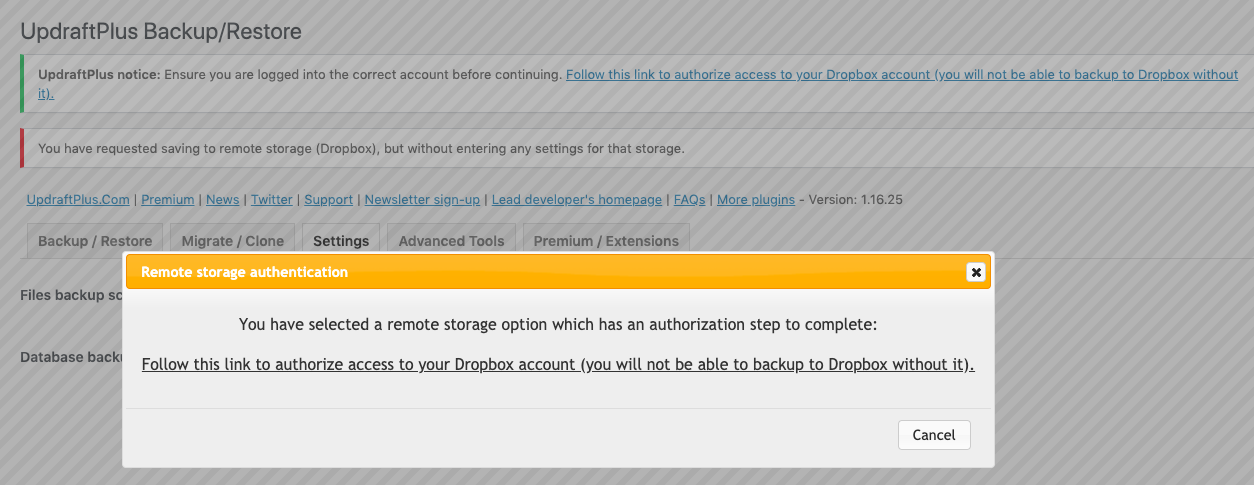
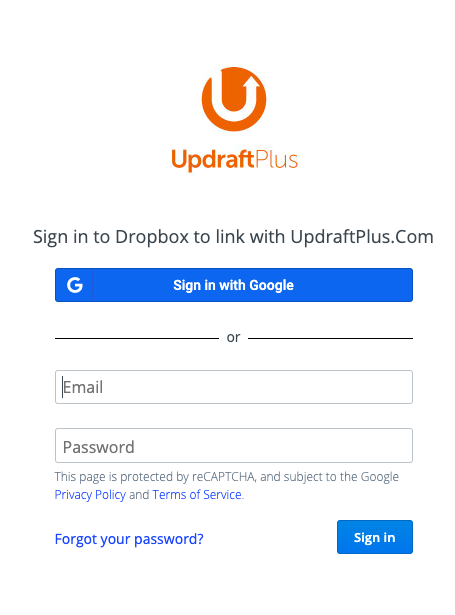
- Click on the link to complete the process. When you click on the link, a new window will open asking for your account information.
- Click Complete Setup to grant UpdraftPlus.com access to your remote provider.
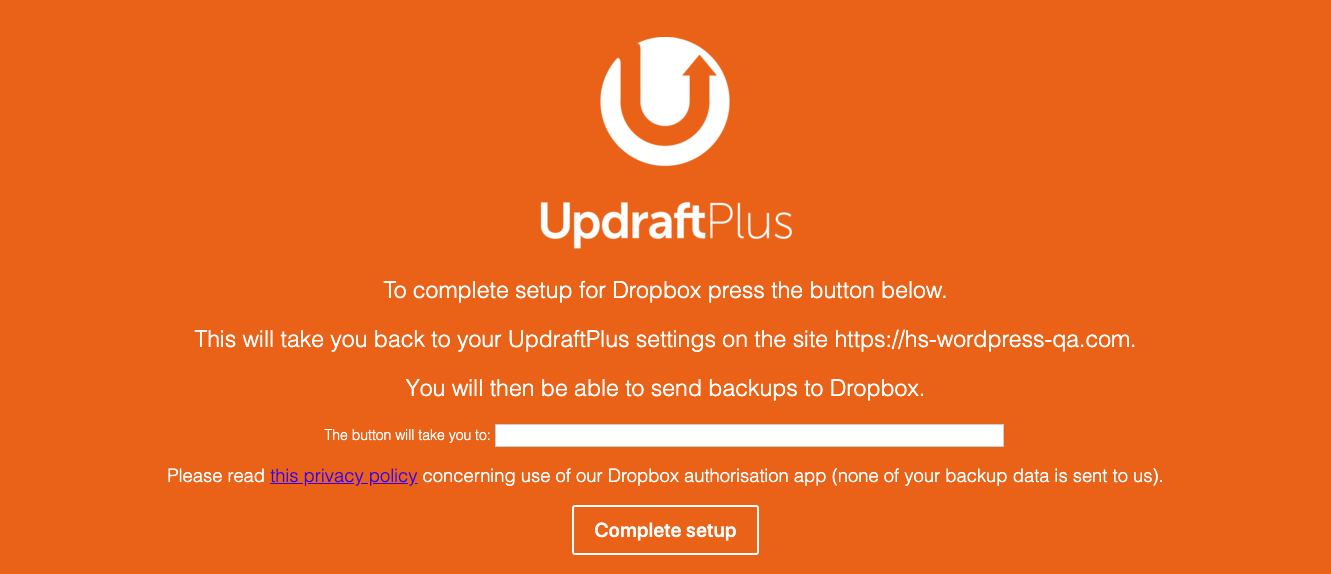
- Once your account has been authenticated, you will be redirected to your WordPress dashboard.

While this successfully sets up the UpdraftPlus plugin for WordPress backups, WordPress's official documentation advises that a manual backup is still necessary occasionally even with a backup plugin.
The majority of hosting providers offer cPanel for managing your website. Backing up your files is easy with its intuitive interface. Here's how to backup your website using cPanel:
- Log into your cPanel account (usually
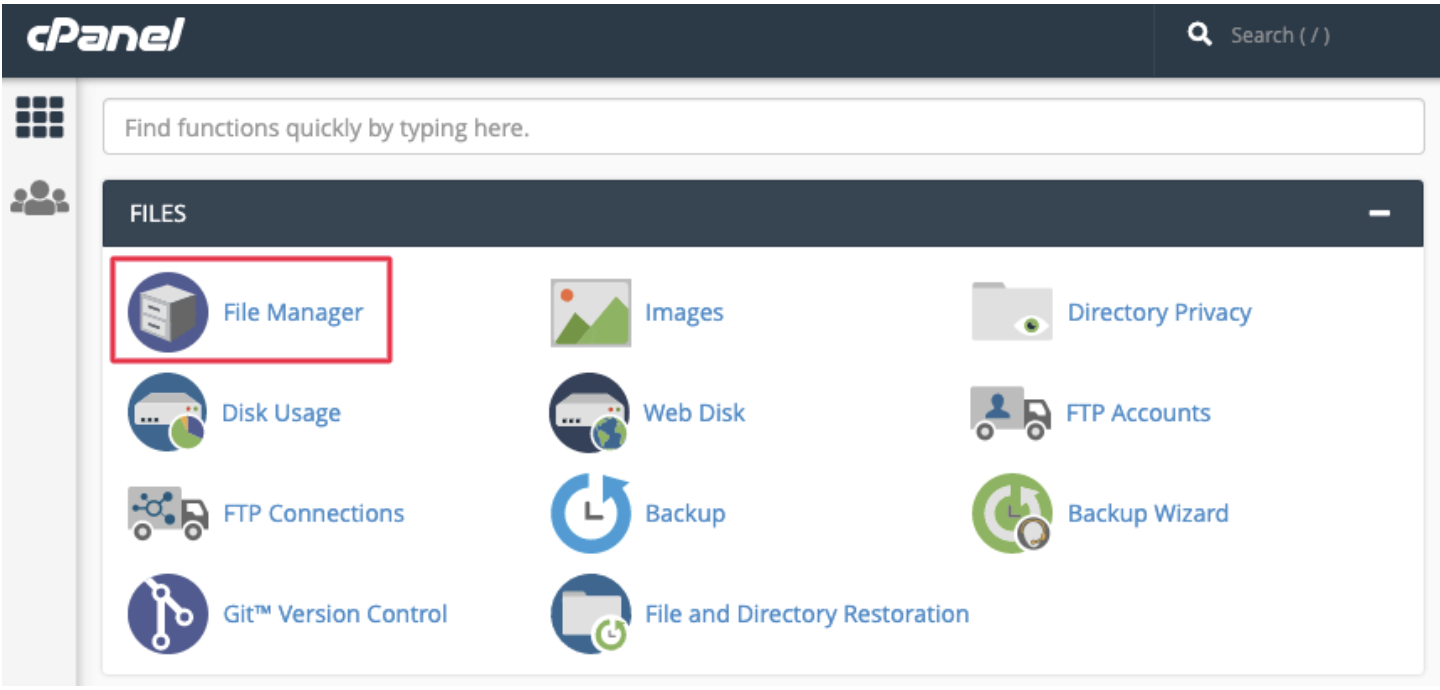
www.yourdomain.com/cpanel). - Under Files, click File Manager.
- Locate the public_html folder on the left panel and expand it by clicking the + symbol. Choose the folder with the name of your website.
- Right-click the folder for your website and select Compress. (Compressing the files will reduce the time it takes to save the backup.)
- Click Compress File(s) to compress the Zip Archive(s).
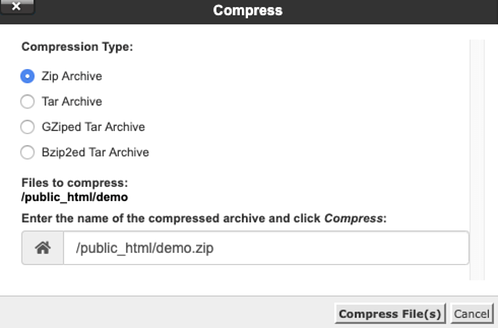
- The zip file will be downloaded once the compression is complete.
- Place your backup on your hard drive in a secure location.
Backup WordPress Files Manually with FTP
This section will guide you through using FTP to back up WordPress manually if that's your only option. The following steps will help you download the files from your server using an FTP client:
- Find the application credentials: This includes the server's IP address, hostname, username, and password. In some cases, you may also need the port number. In most cases, you can find them on your host's dashboard. Our example site is hosted on Cloudways. Details can be found under Application Credentials in the Access Details section. In the event that you haven't created those credentials, you can do so by creating a username and password. After that, copy the IP address, username, and password.
- Set up an FTP client: There are several to choose from, including FileZilla and Cyberduck. Cyberduck will be used in this case.
- Connect to server: Click Open Connection. From the dropdown menu, select the correct protocol. SFTP was used in our case. Once you have copied the credentials, paste them. Click Connect.
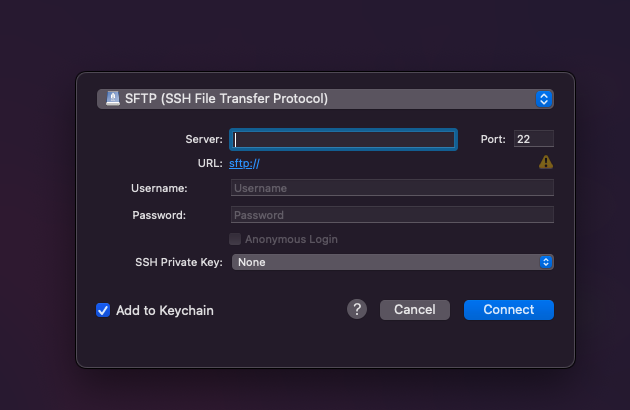
- Backup files: Your files can be found in the
public_htmlfolder in the root directory. Back up the files you want. In general, the larger the site, the longer it will take to backup.
Backup WordPress Website Files Manually with SSH
We highly recommend against using this process because it was a really long one. If you want to try it out, you'll need access to your terminal, username, password, and server IP.
Install WP-CLI: After testing the SSH method of backing up a site, we realized that we didn't have PHP and needed to install command-line tools, a package manager called Homebrew, and then PHP before we could install WP-CLI.
Create a folder: We recommend creating a folder on your device where you can store both exports for ease and organization. Your entire backup is kept in one place, making restoring easier. The path to this folder should be copied. On a Macbook Air, select the folder, click View > Show Path Bar. At the bottom, you should see the path. Choose the option to copy the folder as a path by right-clicking on the path in the folder. This should be pasted in a convenient location for future reference.
Download the files to the local folder: Open your terminal, and execute the following command:
scp -r username@serveraddress:rootfolder localfolderYou must enter the entire path for both the root and local folders. Once you have completed this step, you will be prompted to enter your password. Your entire root folder will be downloaded to your local drive.
How to Back Up the WordPress Database Manually?
Now that you've backed up your files, let's start backing up your database manually. Basically, there are two ways to do this: using phpMyAdmin or using SSH.
A. Manually Backing Up Your Site Database with phpMyAdmin
It is possible to access phpMyAdmin via cPanel if you use the phpMyAdmin method. Adminer is another database management tool that your web host may use if cPanel is not available. Either way, most of the steps are similar. The entire database needs to be exported into an SQL file. We demonstrate how to use phpMyAdmin via cPanel in our tutorial.
- Access your phpMyAdmin: In the database section of your web host, you can access your phpMyAdmin. Like cPanel, phpMyAdmin is not available on every provider. Cloudways, for example, has its own database manager that you can access through Access Details.
- Locate the right database: Select the Database tab. Choose the database you wish to export.
Note: You can find the name of the database to export in the wp-config.php file.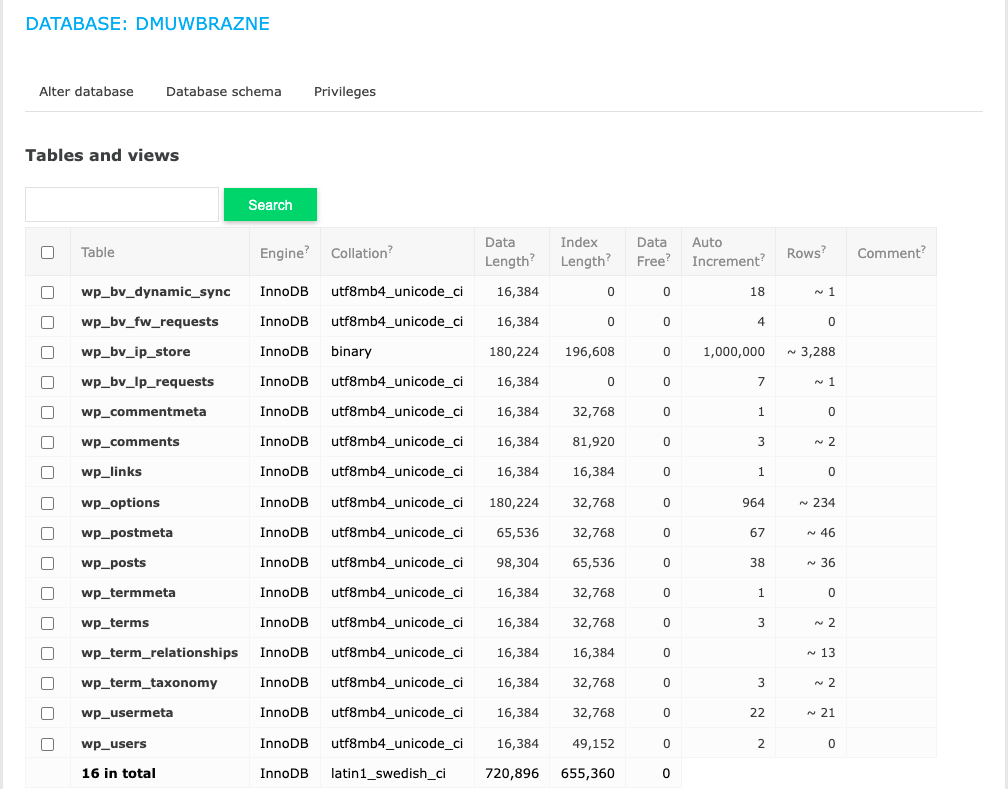
- Export the files: Choose all the tables and click Export.
B. Manually Backup Your Site Database with SSH
In the same way that you use SSH to back up your site files, you can use SSH to export the database to an SQL folder. For this to work, you will need WP-CLI installed.
- Navigate to the wp-config.php file: It's most likely in the root directory of your site. Replace the filename with an appropriate name for your database export by running the following command:
wp db export filename.sql - Download the file to your local machine: Download the database file from the server using the following command:
scp username@serveraddress:rootfolder/filename.sql localfolder
Backups of files and databases should be saved together. A WordPress backup must be restored with both at the same time, otherwise, you risk a critical error on your site.
How to Manually Restore a WordPress Website from a Backup (In 5 Steps)
Backups of your WordPress files and database must be saved to your local computer in order to manually restore your WordPress website. If you don't have much experience with File Transfer Protocol (FTP) or phpMyAdmin, you should still be able to follow the steps below.
Step 1: Log in to Your Hosting Account and Open phpMyAdmin
You'll need to log into your hosting account and access phpMyAdmin, the database manager WordPress uses. The phpMyAdmin icon can be found under Databases in cPanel.
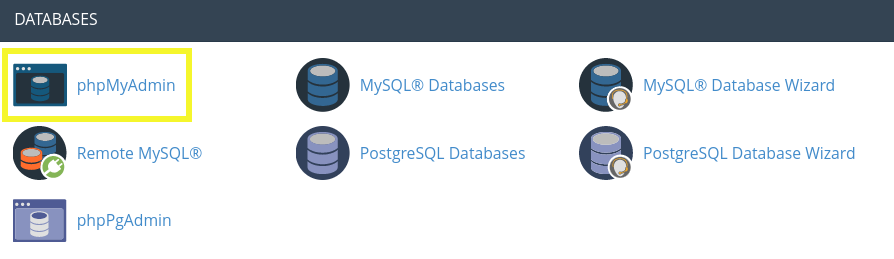
This platform should still be accessible to hosts who use other control panel interfaces. It may be in the documentation provided by your provider. Navigate to the Databases tab in phpMyAdmin once it has been opened.
Step 2: Import Your Backup Database
If you decide to restore your existing database, you'll have the option of either emptying it and importing your backup or deleting it and creating a new one. Remember to add your new credentials to your wp-config.php file if you choose the latter route.
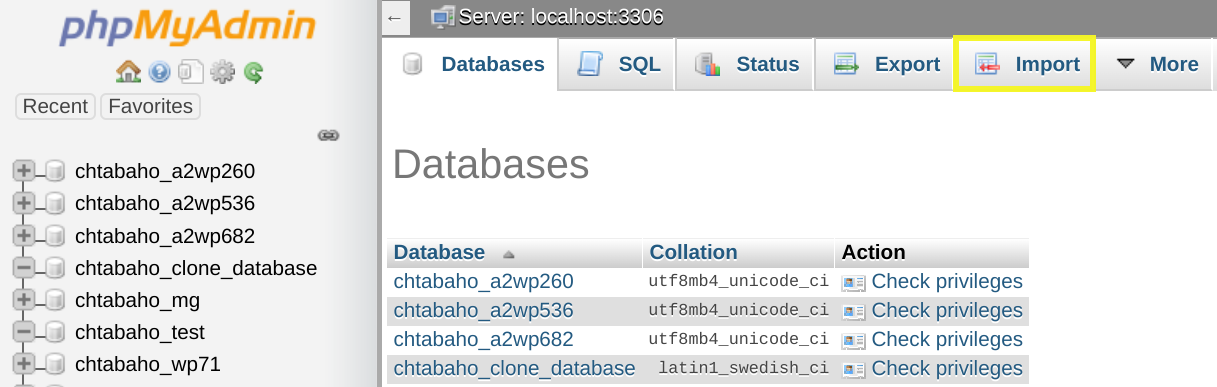
To restore your WordPress backup, click the Import tab at the top of the screen after finding the database you want to restore:
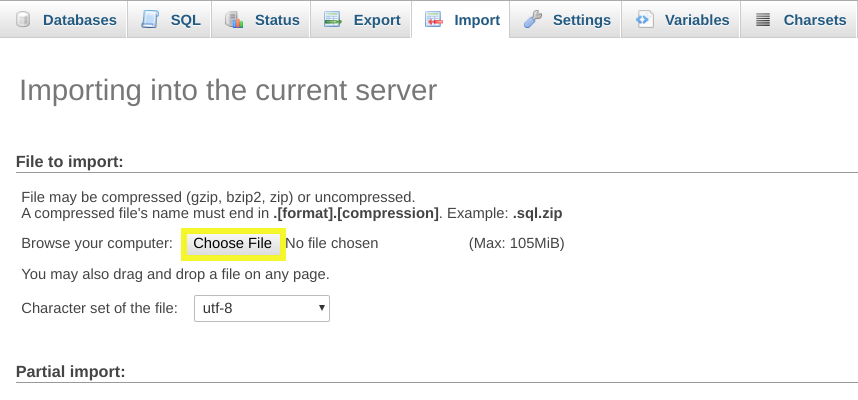
Click on the Choose File button and select your backup database in the File to Import section:
Under the Format section, choose SQL from the dropdown:
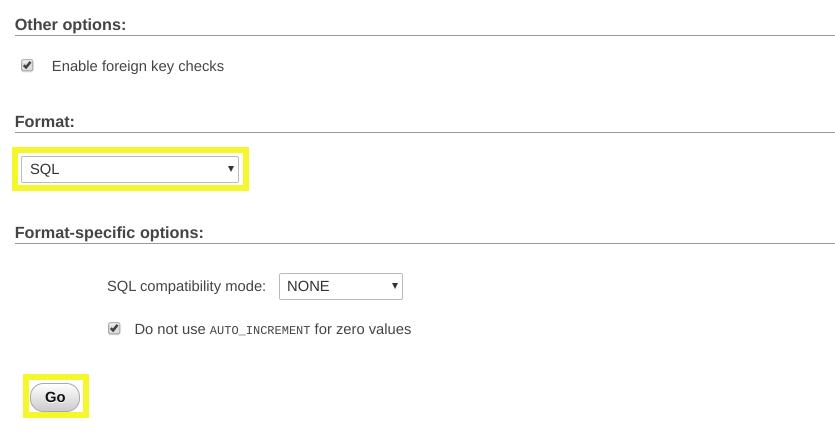
Then click the Go button. When phpMyAdmin imports your backup database, it may take some time, but once it's done, you should be able to access your posts and pages again.
Step 3: Install and Log in to Your FTP Client
Now that you have your database up and running, it's time to focus on your WordPress files. You can restore them using your hosting provider's file manager or an FTP client like FileZilla:
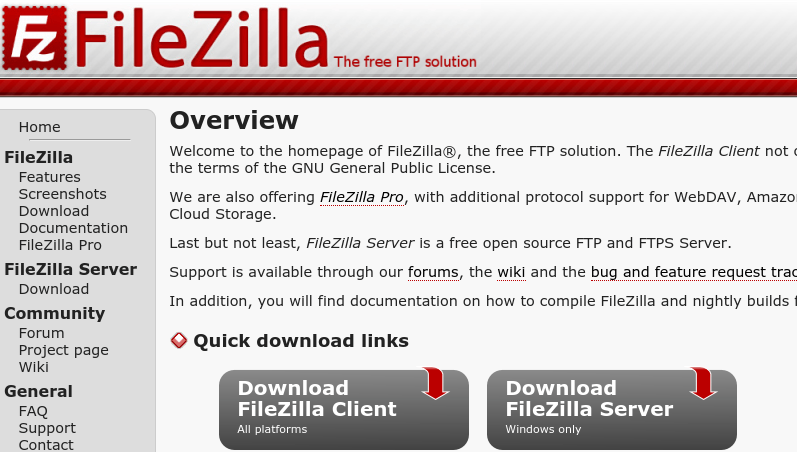
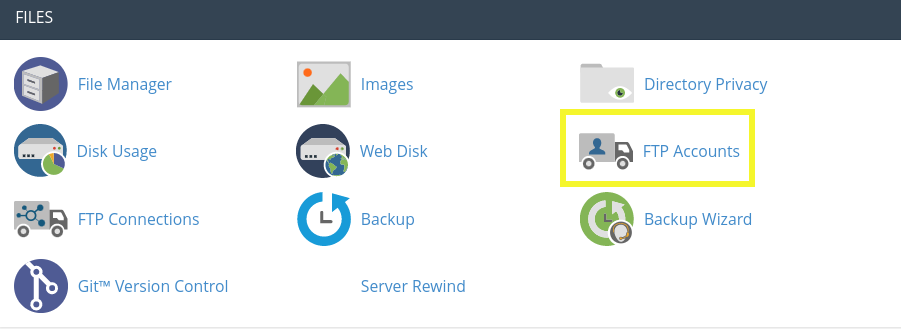
You will need to retrieve your FTP credentials from your hosting account for the latter option. Depending on your provider's control panel interface, this information will be located differently than the link to open phpMyAdmin.
Click on FTP Accounts under Files in cPanel to find your credentials:
After downloading and launching FileZilla, log in with your credentials and click on Quickconnect:
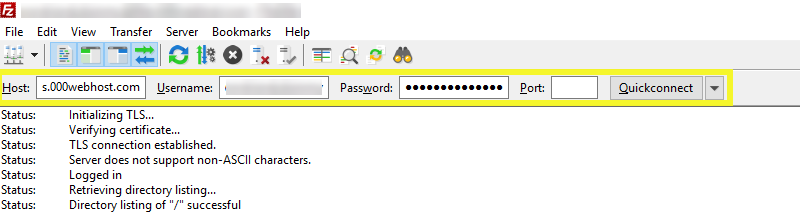
You should now be able to connect to your server. Once the Directory listing of "/" is successfully updated, you'll know it worked.
Step 4: Upload Your WordPress Backup Files
FileZilla displays your local files on the left side of the screen. Make sure your backup is in an unzipped file and saved on your computer so it can be accessed from here. On the right, you will see the 'remote site' (your server):
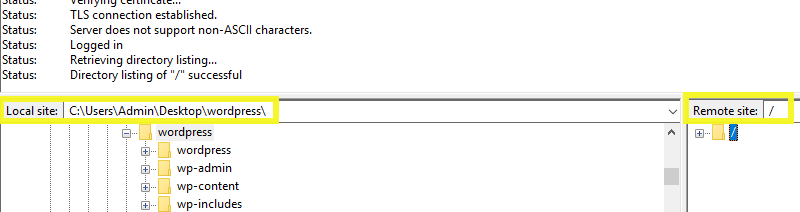
You will now need to delete the old files from your server. Make sure your backup includes any custom code you want to save, otherwise you won't be able to recover it. By right-clicking on the old files in FileZilla, you can delete them.
Upload your backup next. From your local computer, you can drag and drop files to FileZilla. There should be an obvious Upload option on other platforms.
FileZilla has three tabs at the bottom of the screen: Queued files, Failed transfers, and Successful transfers. Your queued files are those that are currently being uploaded from your local computer to your server.
Your backup files will appear under the Successful transfers tab once they have been uploaded. The process could take a while, depending on your website's size. Your restoration should be complete once the number of queued files reaches zero.
Step 5: Check to Verify That Your Site Was Safely Restored
After your files have been transferred, you'll want to check your website to ensure everything is working properly. Verify that your plugins were successfully transferred. Some of them may need to be re-installed and/or reactivated.
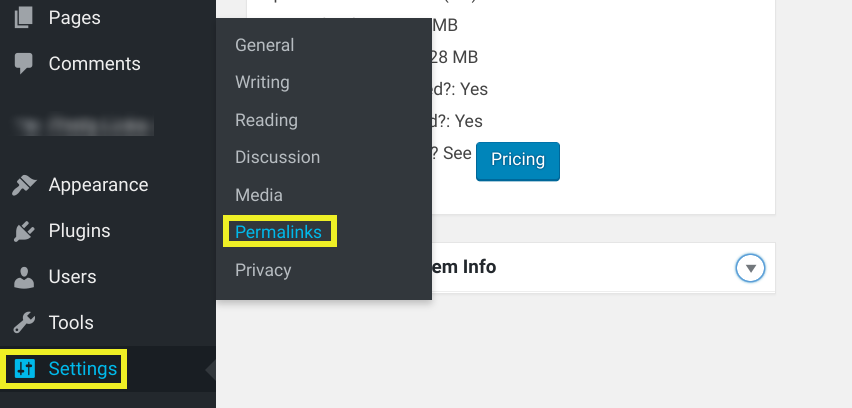
You may also have changed your permalink structure, causing your page and post links to break. In your WordPress dashboard, go to Settings > Permalinks to verify they're working correctly:
You should also change your WordPress admin password. Consider requiring new passwords for all users, including those in Multisite networks. If your website has been hacked, this is especially important.
Lastly, now is a good time to install multiple security and backup measures. Hopefully, you won't need to restore your WordPress website again. Nevertheless, if you do, you'll be equipped with the knowledge you need.
Conclusion
Knowing how to restore a backup is essential, regardless of whether your site has been defaced by hackers or is down due to compatibility issues. You can go about this in a variety of ways. Nonetheless, manual restoration gives you more control than some of the other options.
Related Posts
Steps to take manual Backup and Restore for your wordpress site
Steps to take manual Backup and Restore for your wordpress site

How to Customize WordPress Plugins
WordPress plugins make it easy to add powerful features to your website, but their default functionality may not always fit your specific needs. By customizing plugins, you can extend their capabilities and tailor them to your requirements without building everything from scratch.
Wordpress SEO
Search engines are the biggest source of traffic for most websites.

How To Migrate A WordPress Site
Migrating a WordPress website may become necessary if your current hosting provider no longer meets your needs. With the right approach, you can transfer your site safely and efficiently while minimizing downtime and preserving your data.