
WordPress Multisite
WordPress Multisite: What It Is, How to Activate and Manage It
WordPress Multisite
WordPress Multisite: What It Is, How to Activate and Manage It
For WordPress users who need to manage multiple websites conveniently, WordPress Multisite is a great feature. With Multisite, you can manage multiple websites from one dashboard without having to create separate WordPress installations.
An in-depth guide to WordPress Multisite is provided in this article. The purpose of this article is to explain how WordPress Multisite works, its pros and cons, and when it should be used.
We will also provide a step-by-step tutorial on how to set up and manage WordPress Multisite, and answer some of the most frequently asked questions.
What Is WordPress Multisite?
Using WordPress Multisite, you can create and manage multiple websites on your host server under the same WordPress installation. You will be able to manage a network of individual WordPress sites from one dashboard.
Using WordPress Multisite, businesses, and institutions can set up a network of subdomains or subdirectories to host multiple websites. As an example, site1.example.com and site2.example.com can be subdomains of a primary website with the domain example.com. If you prefer, you can create subdirectories like example.com/site1 and example.com/site2.
Multisite can be used by schools and universities to create multiple sites for different departments. In the same way, a corporation can create websites for each of its offices or branches.
How Does WordPress Multisite Work?
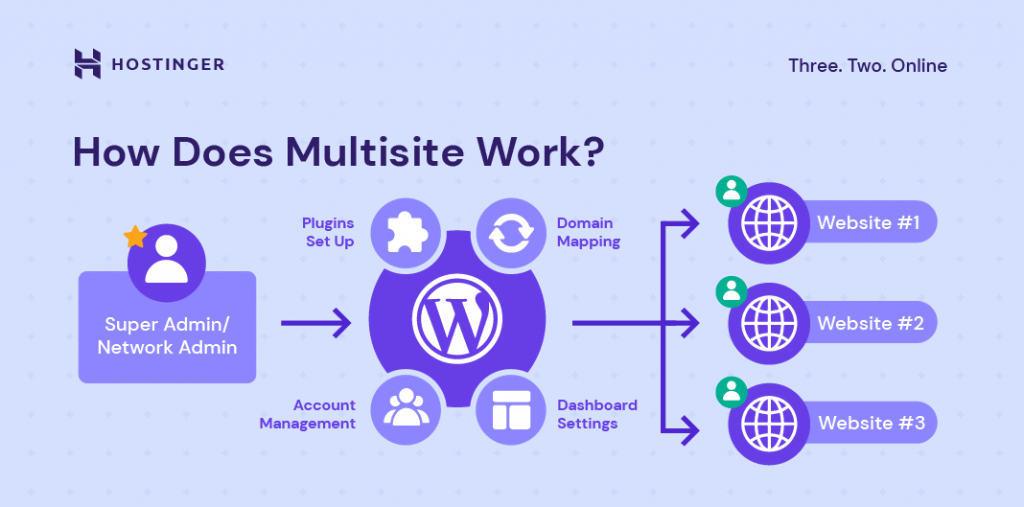
Understanding the difference between a super admin and a site admin is essential to understanding WordPress Multisite.
In addition to managing a network of websites, the super admin is also known as the network administrator. Multisite was first activated by this admin.
Admins have access to the Network Admin settings and the dashboards of every website in the network. Websites and accounts can be created by users.
Plugins and themes are installed and uploaded by the super admin for all sites on the network. Custom domains can also be mapped by super admins.
Typically, a WordPress multisite network admin can only manage one website. Administrators may, however, have access to more than one website depending on the permissions they have been granted by their super admin.
User accounts can only be added by site administrators to websites that they administer. A site administrator can generally choose which plugins or themes to activate or deactivate, even though they cannot install WordPress plugins or themes.
When to Use a WordPress Multisite (and When Not to)
It may not always be the best strategy to use WordPress Multisite in some cases.
When you want to run multiple websites that are similar, WordPress Multisite is an excellent solution. Websites that share code, such as WordPress core files, plugins, and themes, will benefit from it.
Harvard University's Harvard Blogs is an example of a WordPress Multisite network. Harvard.edu email addresses can be used to create a blog for students and faculty.
However, WordPress Multisite might not be right for you if your websites are unrelated or very different. Since most features and functions must be shared and enabled by the network administrator, you might find Multisite limiting.
WordPress Multisite, for instance, isn't suitable for web developers creating sites for different clients. Code and configurations are usually unique to each client's website. Centralizing the management of all client sites would be challenging.
Consider the following comparison of WordPress multisite versus individual WordPress sites to better understand when to use each:
Pros and Cons of WordPress Multisite
Let's take a look at some of the pros and cons of WordPress Multisite now that we have explored the different use cases. Before you use Multisite, make sure you consider them.
WordPress Multisite Benefits
- Efficient management: A single WordPress dashboard allows you to install updates, perform backups, and install security and performance plugins.
- Easier delegation: With WordPress Multisite, you can assign lower-level administrators to different sites in your network, making site management easier.
- Greater control: You can control which plugins and themes each site uses if you run multiple sites. Plugins and themes that compromise the security or performance of the entire network are less likely to happen.
WordPress Multisite Drawbacks
- More limitations: Multisite networks share databases, so you can only conduct network-wide backups and updates.
- Higher risk: Since all websites share the same server resources, if the shared network goes down, all sites will crash. Cyberattacks can compromise other websites as well if they occur on one.
- Interdependent performance: Site performance is highly dependent on the amount of traffic received by other sites on the same network. The performance and speed of other websites may also suffer if one website experiences a sudden spike in traffic.
- Limited plugins and themes: Multisite networks are not supported by all plugins and themes.
- Limited choice of hosting providers. There are some web hosts that do not support WordPress Multisite.
How to Set Up WordPress Multisite on Subdirectories
The next step is to install WordPress Multisite if you've decided it's the right solution for you.
WordPress Multisite can be installed automatically via your hosting account's control panel, depending on your hosting provider. Getting started with WordPress is easier if you choose a hosting plan with a multisite feature.
In the next four steps, we'll explain how to manually set up WordPress Multisite.
Prerequisites
Consider these requirements before activating WordPress Multisite:
- Web hosting: Ensure that the hosting plan you purchase can handle multiple domains or sites.
- WordPress installation: To set up a multisite network, you should install WordPress from scratch. An existing WordPress installation can also be used, but make sure to deactivate plugins and create a backup first.
- FTP access: Use an FTP client like FileZilla to access your WordPress installation.
1. Update the wp-config.php File
Your website's configuration file must first be located and edited. This file can be found in the root directory of your WordPress website, in the wp-config.php file.
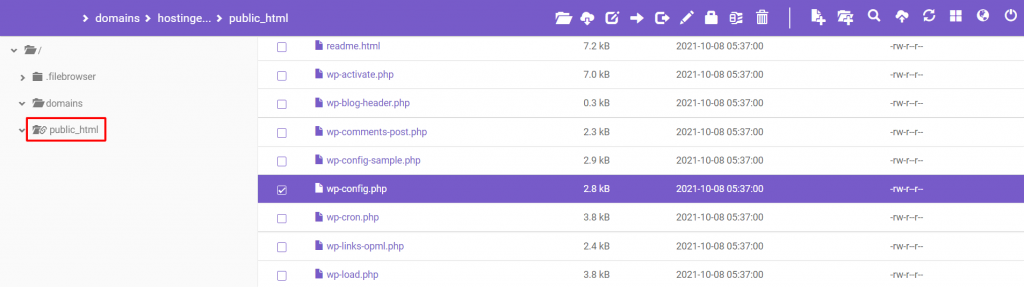
The wp-config.php file contains the details of your site's configuration, such as database information, hostnames, usernames, and passwords.
To update wp-config.php, follow these steps:
➤ Your website can be accessed by logging into your FTP client.
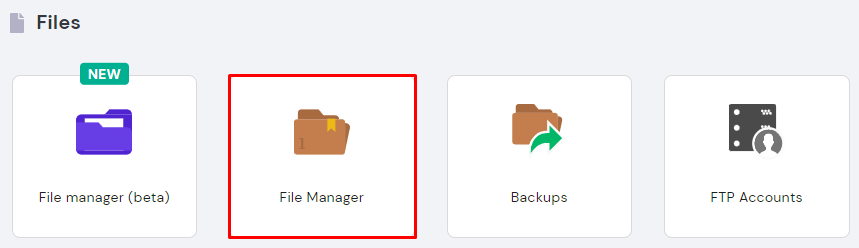
➤ Navigate to the public_html directory, which is commonly called the root directory. File Manager can be accessed through hPanel.
➤ Right-click the wp-config.php file and choose Open/Edit from the menu. You will see lines of code when you open the file.
➤ Scroll down the file until you see /* That’s all, stop editing! Happy publishing. */. Note that sometimes the line may be /* That’s all, stop editing! Happy publishing. */ instead. Above it, add the following code:
/* Multisite */
define( 'WP_ALLOW_MULTISITE', true );
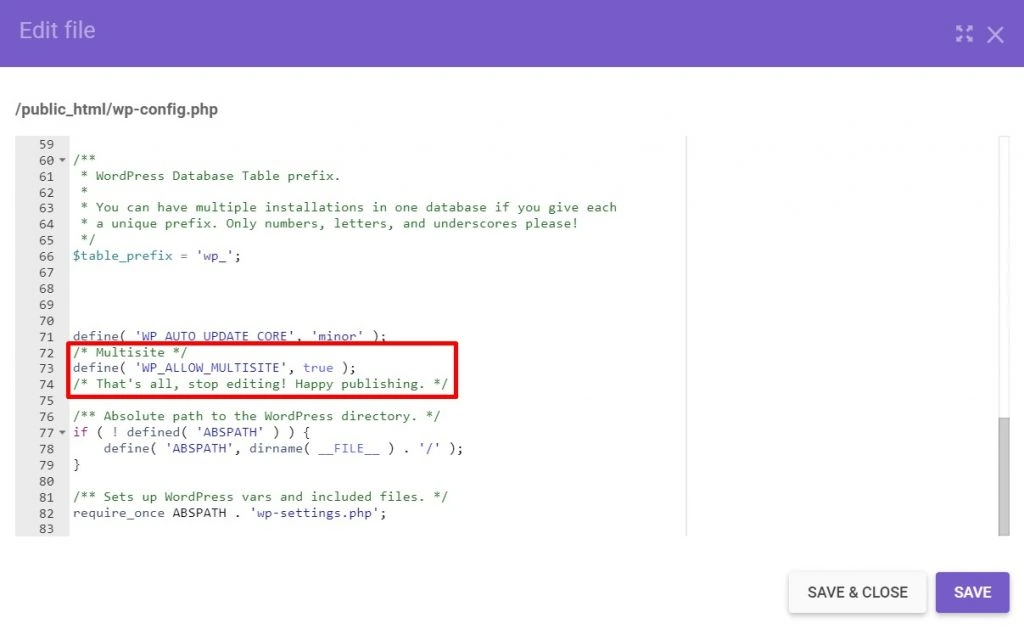
➤ The wp-config.php file should be saved and closed after the changes have been made.
That's all there is to it. WordPress is told that Multisite is enabled by this simple line of code
2. Configure Your Network Structure
The Network Setup screen can be found under Tools in your WordPress admin area. Your WordPress Multisite network will be configured and activated here.
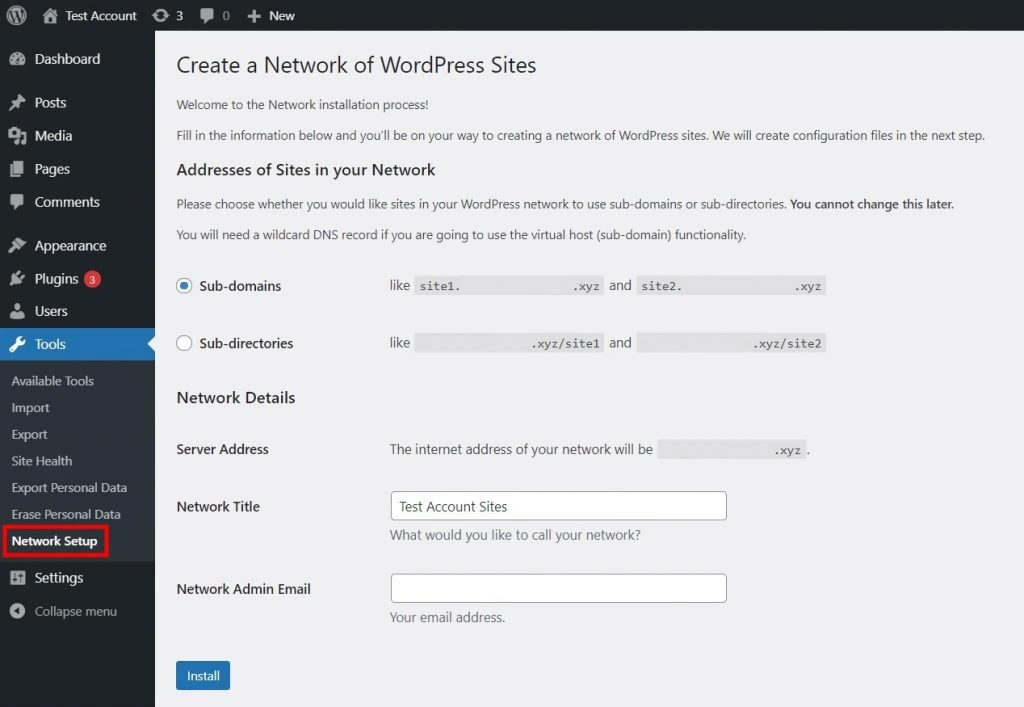
Before continuing, WordPress will prompt you to deactivate any active plugins.
Choose whether to use subdomains or subdirectories in the Addresses of Sites in your Network.
All sites within your network will be affected by this choice, and it cannot be changed later.
Under Network Details, enter a name for your network in the Network Title field. Fill out the Network Admin Email field as well with the super admin's email address.
Click Install after double-checking all the information.
3. Edit the wp-config.php and .htaccess Files
Next, you need to add two code snippets to the wp-config.php and .htaccess files in your WordPress root directory.
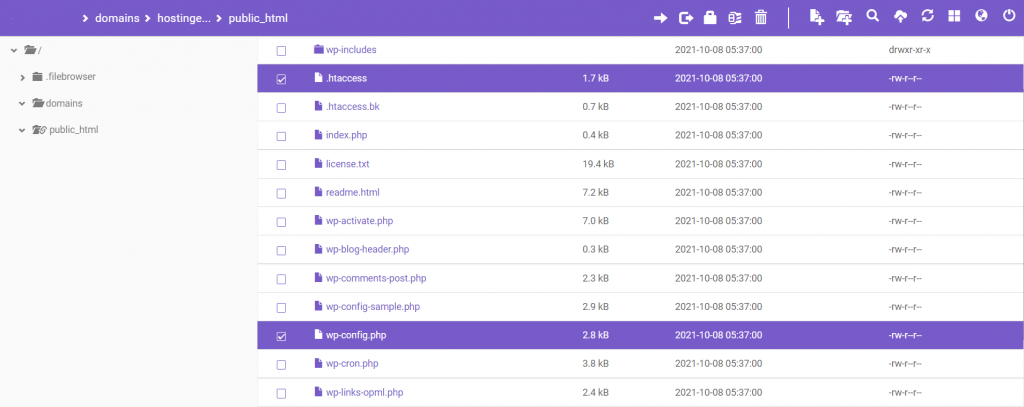
WordPress will prompt you for the appropriate code snippets as soon as you enable the network. An example might be as follows:
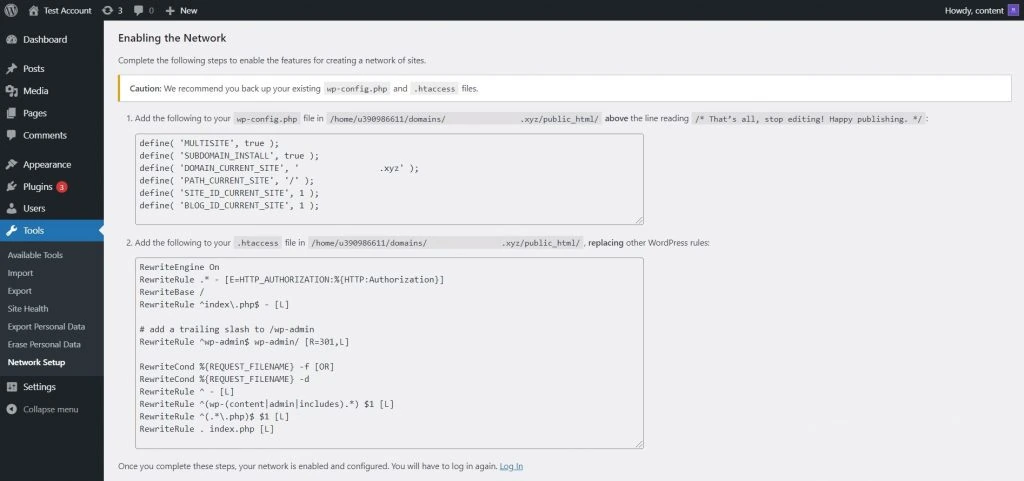
Make sure you have backed up wp-config.php and .htaccess before proceeding.
Follow the instructions by copying the code snippets. Here are some snippets to get you started.
In the wp-config.php file, add the following snippet of code above the line /* That’s all, stop editing! Happy blogging. */:
define('MULTISITE', true);
define('SUBDOMAIN_INSTALL', true);
define('DOMAIN_CURRENT_SITE', 'Your Domain');
define('PATH_CURRENT_SITE', '/');
define('SITE_ID_CURRENT_SITE', 1);
define('BLOG_ID_CURRENT_SITE', 1);
Make sure your real domain is replaced with Your Domain.
In the .htaccess file, add the following snippet of code:
RewriteEngine On
RewriteBase /
RewriteRule ^index\.php$ - [L]
# add a trailing slash to /wp-admin
RewriteRule ^wp-admin$ wp-admin/ [R=301,L]
RewriteCond %{REQUEST_FILENAME} -f [OR]
RewriteCond %{REQUEST_FILENAME} -d
RewriteRule ^ - [L]
RewriteRule ^(wp-(content|admin|includes).*) $1 [L]
RewriteRule ^(.*\.php)$ $1 [L]
RewriteRule . index.php [L]
Make sure both the wp-config.php and .htaccess files are saved.
4. Access the Multisite Installation
The WordPress Multisite network is almost ready. You can now access My Sites from the new network administrator navigation menu in your WordPress admin area.
As a super admin, you can access the Network Admin screens and the primary or original website's dashboard. It is still possible to use your main WordPress site as a regular WordPress site.
The Network Admin screen also allows you to manage sites and user accounts. Every time a new site is created, a new tab is added to the My Sites drop-down menu. In your multisite network, you can find the dashboards for all your websites.
How to Set Up WordPress Multisite With Subdomains
Creating a network of subdomains may lead to a pop-up message like the one below asking you to edit wp-config.php and .htaccess:

The code given by WordPress to edit the .htaccess file has an extra line:
RewriteRule .* - [E=HTTP_AUTHORIZATION:%{HTTP:Authorization}]
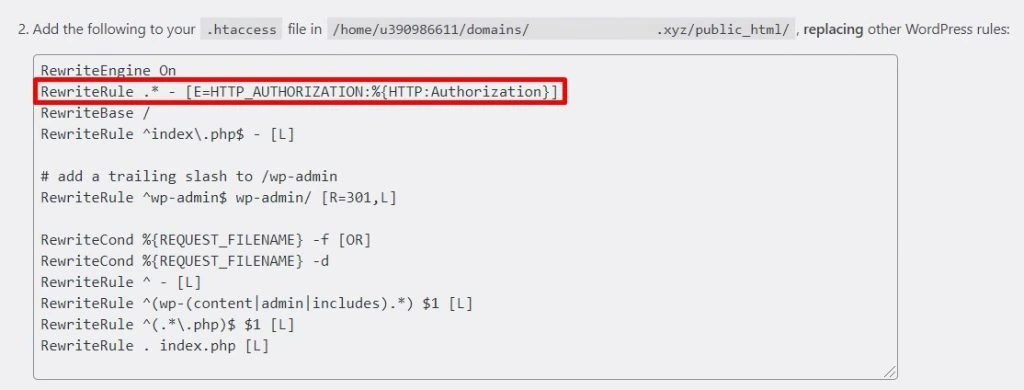
After copying the code snippet, follow the prompts to edit the .htaccess file.
Add a “*” DNS record pointing to your web server. Hostinger users can edit DNS zones via the DNS Zone Editor.
To create the record, insert * in the Name field and the hosting account’s IP address in Points to.

Create your subdomain once that's done. Use the public_html directory box and the Custom folder for the subdomain.
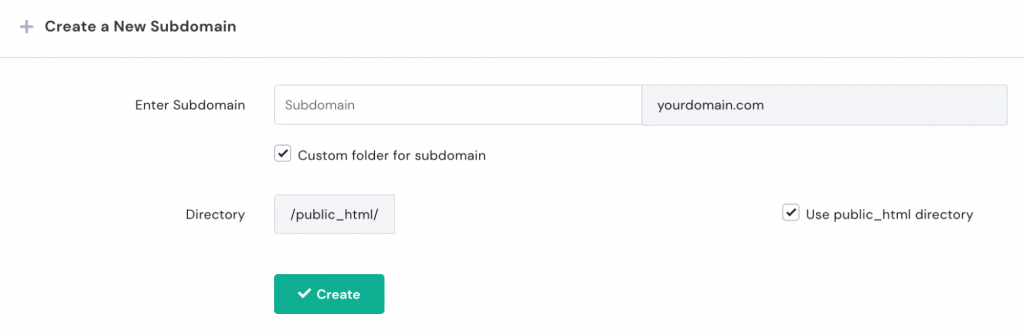
Your subdomain-based Multisite is now ready to go.
How to Manage WordPress Multisite
You can manage a multisite network using the WordPress dashboard by following the sections below.
How to Add a New Website to Your Multisite Network
You will find that your network only contains one website when you complete the Multisite installation. We'll explain how to add individual sites to your network.
Make sure each new site has the following:
➤ URL: You can either specify a subdomain or a subdirectory here.
➤ Title: When visitors access the website, this is the name that they will see.
➤ Admin email: This is for a lower-level administrator who only has access to one website and not the entire network.
Click Add New on the Sites tab on the left-hand side of your network admin screens to access the site settings.
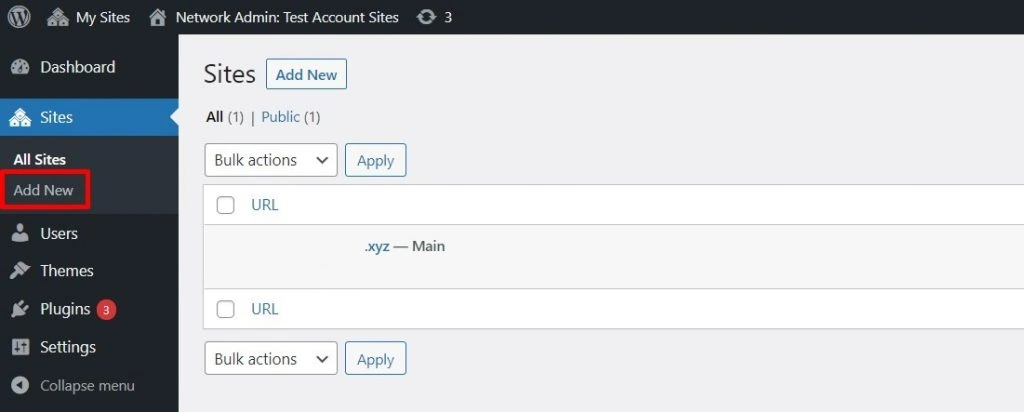
The new website configuration options will appear on a new page. Enter the address, title, language, and email address of the new site. You will then be able to add a site. The example below uses subdomains.
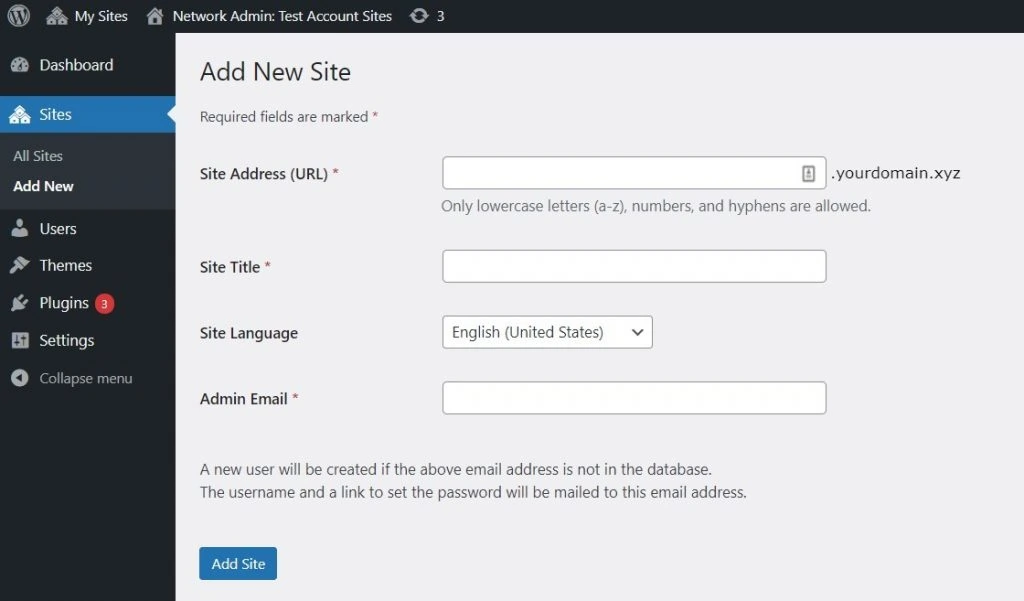
As long as your web hosting plan allows it, you can create as many sites as you want.
On the multisite dashboard, you can find any new sites you create in the Sites section.
How to Manage Themes and Plugins in Multisite
You will be responsible for managing your network's themes and plugins since only the super admin can install them.
It is fairly straightforward to install a WordPress site. You will be able to apply themes and plugins to all your websites if you install them.
New plugins and themes are not automatically activated for all websites after installation.
A super admin can do the following with each plugin:
➤ Network Activate. All sites on the network will run any network-activated plugin. Think about using performance-optimizing tools like security and caching plugins. A site admin does not have the authority to deactivate plugins, unlike a super admin.
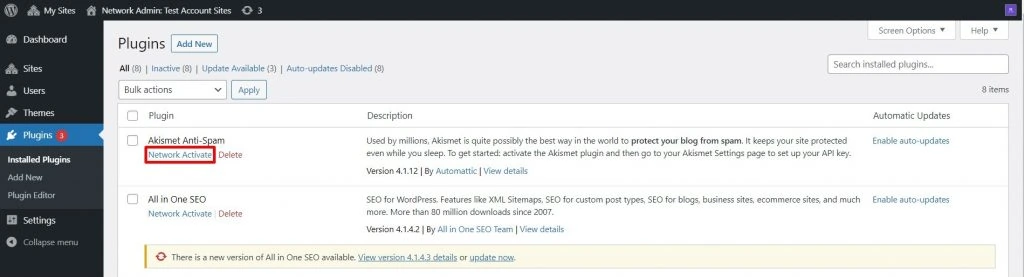
➤ Optionalize it. Plugins installed on the site can be activated by site administrators.
➤ Different permissions should be set for site admins. The network admin can configure site admin privileges through the Settings tab of the multisite dashboard.
With each theme, a super admin can:
➤ Network Enable. There is no need to activate the theme for each site, as this will make it available to all of them. Each website's dashboard allows you to activate it.
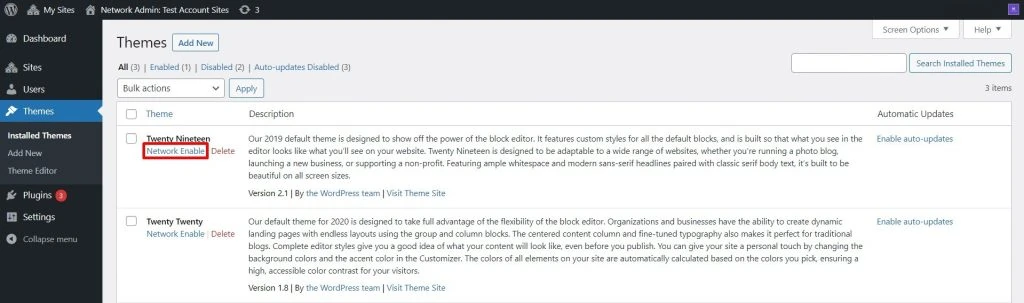
➤ Specify which sites should be enabled. You can do this through the admin dashboard of each website.
➤ Install but do not enable. Invisible to site admins, the theme can only be viewed by a super administrator.
All sites' performance is optimized by super admins updating plugins and themes and removing inactive ones.
How to Add New Users to Multisite
It is possible for a super admin to add new users as network or site administrators.
Navigate to your network admin settings and click Users -> Add New.
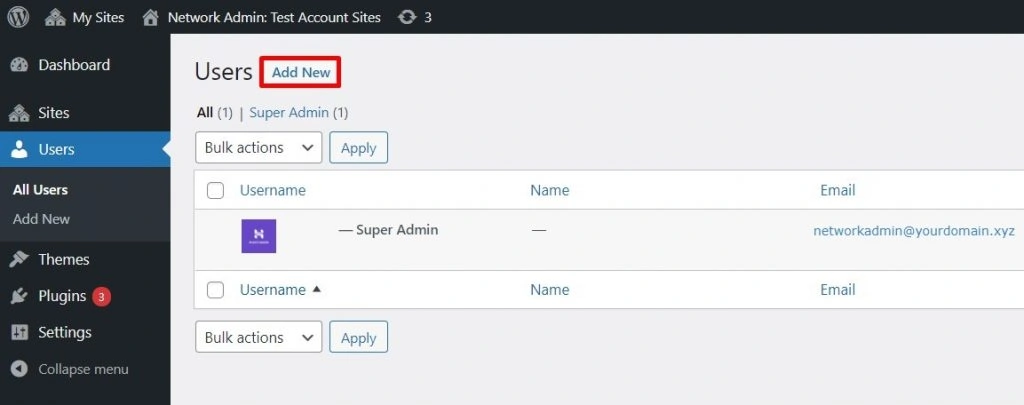
Enter the new user's username and email address here. An email will be sent after the user clicks Add User inviting them to create a password.
Go to Users -> All Users to edit user accounts and permissions. Users can also be granted super admin privileges here.
You should be careful when giving users super admin status since they will have access to your multisite network settings. On a multisite network, it's best to keep the number of super admins as low as possible. One network administrator is usually sufficient.
New site admins can be added by site admins. Navigate to Users -> Add New in your site admin screens.
The multisite network can be expanded by adding new users or by adding existing users. Fill in the necessary information, such as their username and email address, by following the prompts.
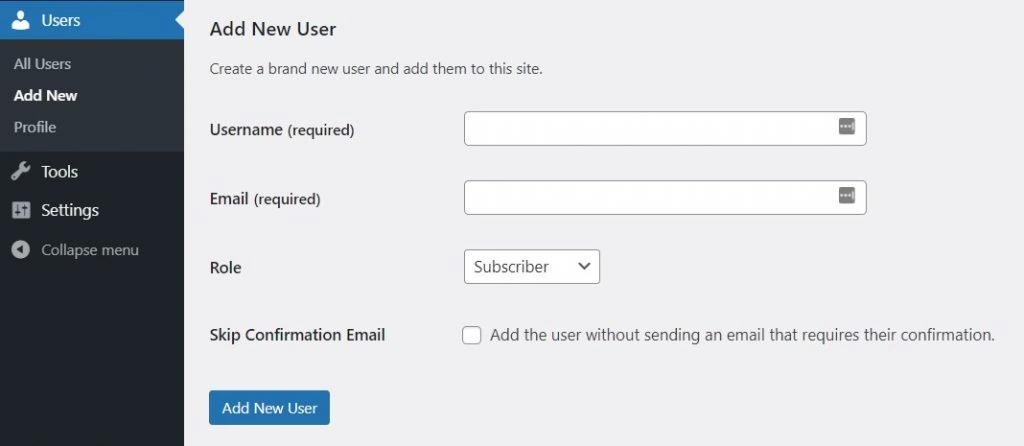
To ensure that users are notified of their new status, don't check Skip Confirmation Email
How to Configure WordPress Network Settings
It is best to double-check the network settings and adjust them before using WordPress Multisite once it is active.
From your network admin dashboard, navigate to Settings -> Network Settings.
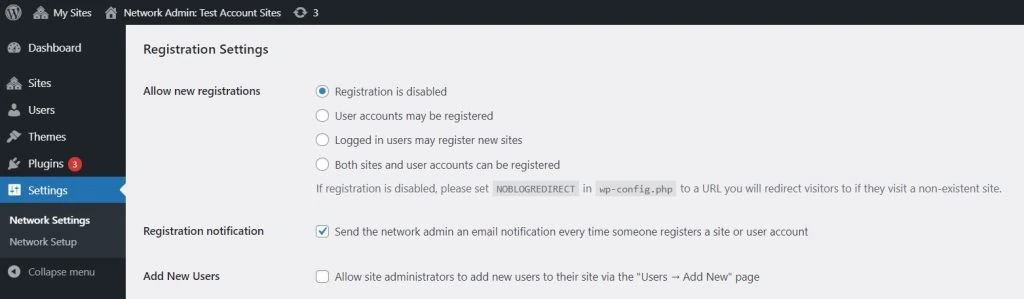
You can configure whether site admins are able to add new sites or users in the Registration Settings. In addition, super admins can activate registration notifications to receive emails when changes are made.
Check the Upload Settings section as well. Attachments can be limited here in terms of type and size.
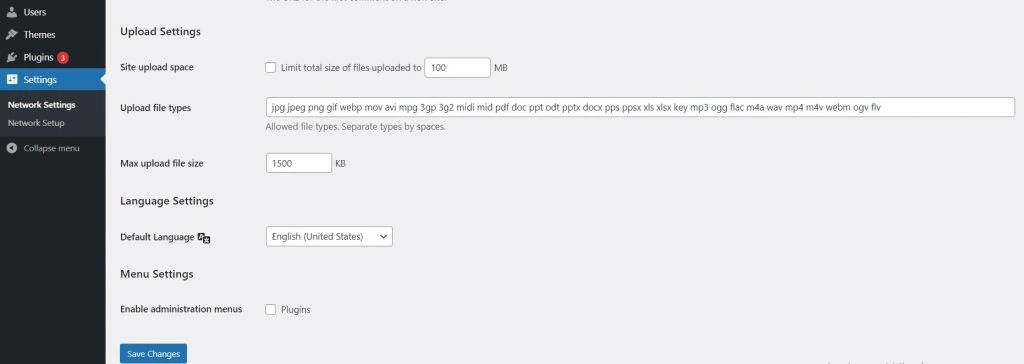
In this way, you won't overload your hosting plan with files it can't handle. Multisite websites share hosting resources, so creating upload limits ensures optimal performance and prevents website lag.
How to Store Media Files on WordPress Multisite
Multisite networks have separate media upload directories that are only accessible by the site's admin and super admin. In other words, a site admin cannot access the files of another site, even if they are on the same network.
Multisite creates a new folder in the wp-content/uploads directory when you activate it on a standard WordPress installation. All WordPress websites in the network are stored in this new folder, sites.
A folder corresponding to the ID of each new website in a multisite network is added to the site's folder every time a new website is created. A multisite network's main site, for instance, has the ID of 1. Whenever you create a new website on the network, it will have an ID of 02, 03, etc.
Be sure to upload files to the correct subdirectory when uploading them to a website within the network.
Here’s how to upload a file to a specific site in the network via File Manager:
#1 Go to your hosting control panel and open File Manager.
#2 Go to the wp-content/uploads/sites directory.
#3 In the first new site after the primary site, we'll upload a file to the second website within the network. Site ID 02 means you should find a directory named 02 or 2 within the sites directory.
#4 Browse to the 02 directory and upload the file there.
Even though separate media file directories have advantages, some users prefer to have a centralized library for all networked websites. It is possible to create a shared media library across multiple computers by installing the Network Media Library plugin.
How to Use SSL with WordPress Multisite
A digital security or cryptographic protocol is crucial to protecting your WordPress website. SSL certificates encrypt communications between a web browser and a website, ensuring secure information exchange.
A WordPress SSL must be installed on your entire multisite network. The security of the entire network can be compromised if one site lacks the proper safety protocols.
Multisite setups on subdirectories require just one SSL certificate for all websites. It is important to set up a different SSL for each website if you are creating sites in a WordPress Multisite network based on subdomains.
In most cases, a free SSL certificate with a web hosting plan applies only to the main domain or website. The SSL certificate will also be required for all other subdomains in the network.
How to Manage WordPress Multisite Database
File systems and databases are shared by all websites within a multisite network. Wp_users and Wp_usermeta are the tables that store user data for an entire network.
WordPress creates seven new tables to store network data when Multisite is activated:
- wp_blogs. This file contains information about each blog within the network, including blog_id, site_id, domain, and path.
- wp_blog_versions. The current database revision of specific blogs can be found here.
- wp_registration_log. Blog registration information, including ID, email, and IP addresses.
- wp_signups. A network's registered users are stored in this file. This table should be empty if user registration is disabled.
- wp_site. Provides brief information about the network(s).
- wp_sitemeta. Provides detailed information about the network (s).
- wp_sitecategories (optional). This table contains global terms (global_terms_enabled = true) if they are enabled.
A new website is created on a multisite network with 11 new database tables corresponding to the site's ID. Site 02, for example, has the following new database tables:
- wp_2_posts
- wp_2_postmeta
- wp_2_comments
- wp_2_commentmeta
- wp_2_users
- wp_2_usermeta
- wp_2_links
- wp_2_term_relationships
- wp_2_term_taxonomy
- wp_2_terms
- wp_2_options
A multisite network creates more database tables as it grows. By using this feature, WordPress ensures that sites are separate and that an administrator cannot access or modify the data of another site.
It is possible to separate a single website from the multisite database, even though networked websites share the same database by default.
Helpful Plugins for Your WordPress Multisite Network
Anyone familiar with WordPress knows plugins make WordPress sites more efficient and effective. The purpose of plugins is to extend the functionality of a website and enable site owners to add new features.
Multisite networks are not compatible with all WordPress plugins. To get you started with your multisite network, here are some of the best plugins.
#1 OptinMonster
Lead generation plugin OptinMonster is popular. A drag-and-drop form builder and an opt-in email form tool help increase conversions.
In addition to simplifying your email list-building process, OptinMonster also offers tools for converting abandoned site visitors into subscribers, curating marketing content, and creating personalized campaigns.
OptinMonster is an excellent solution for Multisite because it displays all of the email campaign analytics for the whole network in one place. Super admins can see the results of any lead generation efforts across all websites and adjust their strategies accordingly.
#2 User Switching
Admins can change the roles of users in a network using the User Switching plugin. If you need to conduct site-specific troubleshooting or testing, this is especially helpful.
One of the great features of this plugin is that it still maintains security precautions. Even when users switch between accounts, passwords, and sensitive account information remain confidential.
Super admins can also configure which accounts can use User Switching.
#3 Multisite Enhancement
From one dashboard, super admins can view and customize all sites within a network. Multisite Enhancements add extra functionality to the network dashboard.
Rather than working with separate site admin dashboards, the Multisite Enhancements plugin displays each website's information and settings in one place. It's possible, for example, to display what resources each site uses or what plugins or themes are active.
The plugin allows super admins to hide certain technical information from the site admin dashboard.
Conclusion:
In this article, we've discussed WordPress Multisite, its pros and cons, and which types of websites and users benefit most from it. For people who run multiple similar websites, we recommend it.
In addition, we provided a step-by-step guide for setting up WordPress Multisite on subdirectories and subdomains. In order to enable Multisite, you need a web host that supports Multisite, a WordPress installation, and FTP access.
From adding a new website to managing its database, we covered all the basics of WordPress Multisite management. The final section of the article included a list of WordPress Multisite plugins that can enhance the experience.
It is our hope that this article has helped you better understand WordPress Multisite and how to utilize it to the fullest extent possible.
Related Posts
Wordpress Speed optimization
Page Speed: Why It's Important!

How To Migrate A WordPress Site
Migrating a WordPress website may become necessary if your current hosting provider no longer meets your needs. With the right approach, you can transfer your site safely and efficiently while minimizing downtime and preserving your data.
WordPress Malware Removal
WordPress Malware Removal
Steps to take manual Backup and Restore for your wordpress site
Steps to take manual Backup and Restore for your wordpress site