
Wordpress SEO
Search engines are the biggest source of traffic for most websites.
Wordpress SEO Guide
Why is SEO Important?
Search engines are the biggest source of traffic for most websites.
When you optimize your WordPress website and content, you’re more likely to reach the people who are actively searching for information about services and products related to yours. This is done organically, meaning you are not paying Google or other search engines to place your content at the top of the results page.
Improve your WordPress website’s SEO, boost your organic traffic, and increase your authority on search engines so you can get more visitors and customers.
You don’t have to be a tech genius to use the techniques below. If you’re already using WordPress, then you’ve got what it takes!
Let’s get started optimizing your website’s SEO.
1. Check Your WordPress Visibility Settings
Check your visibility settings in WordPress. The software actually has a setting that allows you to hide your website from search engines. This can come in handy when building or rebuilding your site and don’t want visitors to see your work in progress.
The feature is found in your WordPress dashboard under Settings > Reading.
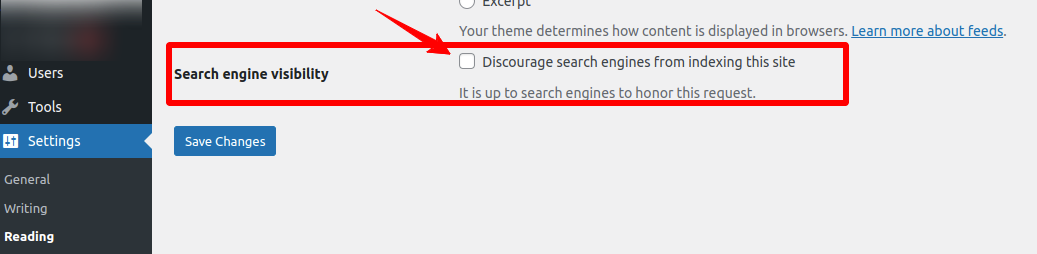
Double check that you haven’t accidentally turned on this feature, or left it on after completing your website. If it’s on, your SEO won’t work.
2. Change Your Permalinks
A permalink is a permanent URL or link to a specific post, page, or blog on your website. Permalinks clearly state what your post, page, or blog actually is (in the URL itself) so visitors know what they are clicking on. You should change your permalinks to not only improve user experience, but to also improve your SEO — search engines read permalinks to determine whether or not your website has answers to certain search queries.
For example, in the case of your Essential oils store, if you had a page dedicated to share essential oils your permalink might look something like this: yoursite.com/10-ways-to-use-sandalwood-essential-oil.
To change your permalinks to include an accurate description of your content, head to your WordPress dashboard, click “Settings” and then “Permalinks”.
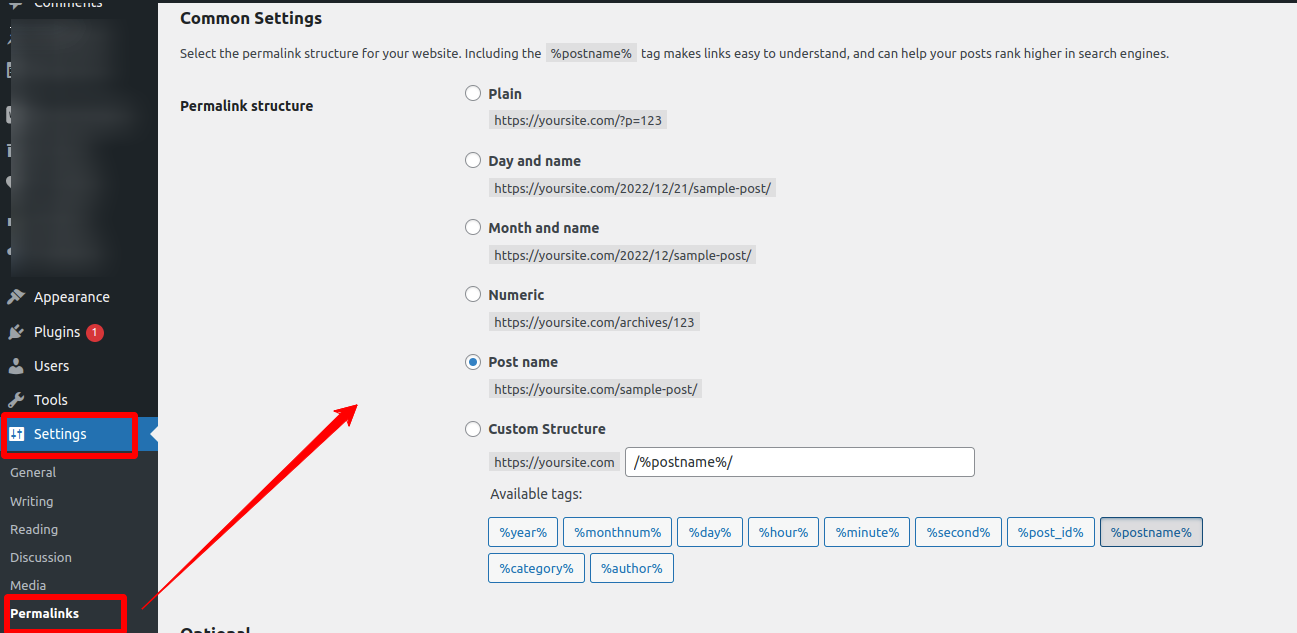
Click “Save Changes” when you are done.
3. Use Tags and Categories
Tags and categories allow you separate your website’s pages and blog posts into specific and broad groups, respectively. This improves your SEO because it allows search engines to understand your website’s structure and the content your website actually contains.
Tags and categories also improve user experience by allowing visitors to quickly find the content they’re searching for and make it easier for you to manage all of your website content.
Tags
Tags are like keywords that you can use to describe what a specific page or post is about. For example, if we think about your tricore-it-solutions’ website, the tags on one of your pages may include “web development”, “web design”, or “graphic design”.
To add a new tag or view your current tags, go to your WordPress dashboard and click “Posts” and “Tags”.
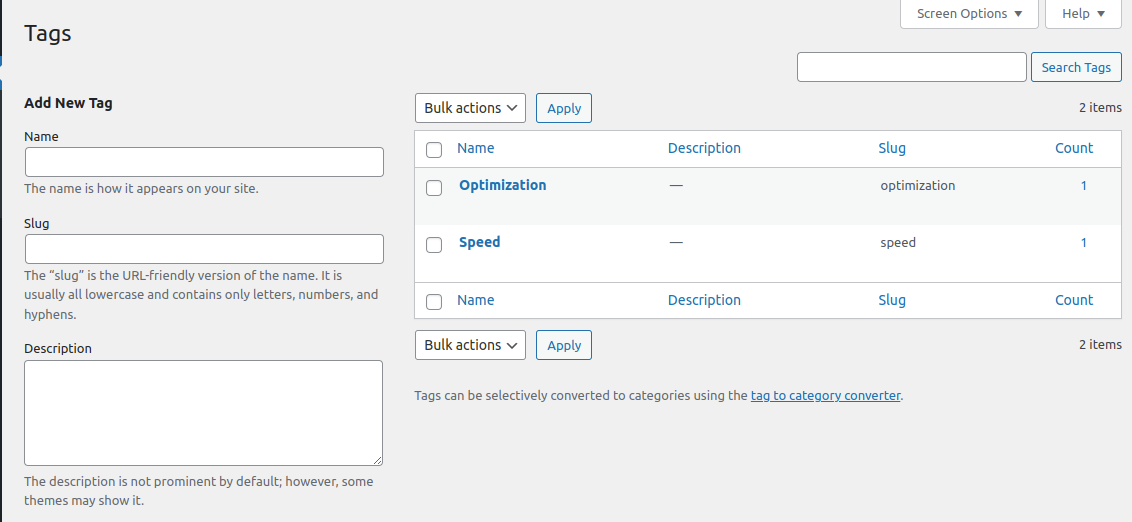
You can view current tags or “Add New Tag” here. For more information on tags, check out this list of tips.
Categories
Categories are how to you broadly group your posts and pages. In the case of the tricore-it solutions, your categories may include “web development”, “web design”, or “graphic design”.
To create a category, go to your WordPress dashboard and click “Posts” and “Categories”. Here you’ll see your current categories as well as an “Add New Category” button.
For details on other ways to create categories, check out this page.
4. Choose an SEO Plugin
WordPress plugins enhance the functionality of your website by adding features that don’t come standard with the software. There are tens of thousands of plugins available, many of which can help you improve your SEO. If you are unaware of which plugin you want to implement on your site, you can search the WordPress plugin library for options that fit your needs.
SEO plugins, such as Yoast SEO, All In One SEO, and Rank Math SEO offer features to help you build XML sitemaps, implement tags and categories, optimize your titles and content with the use of key phrases and keywords, control your site’s breadcrumbs, and take advantage of Google Analytics support.
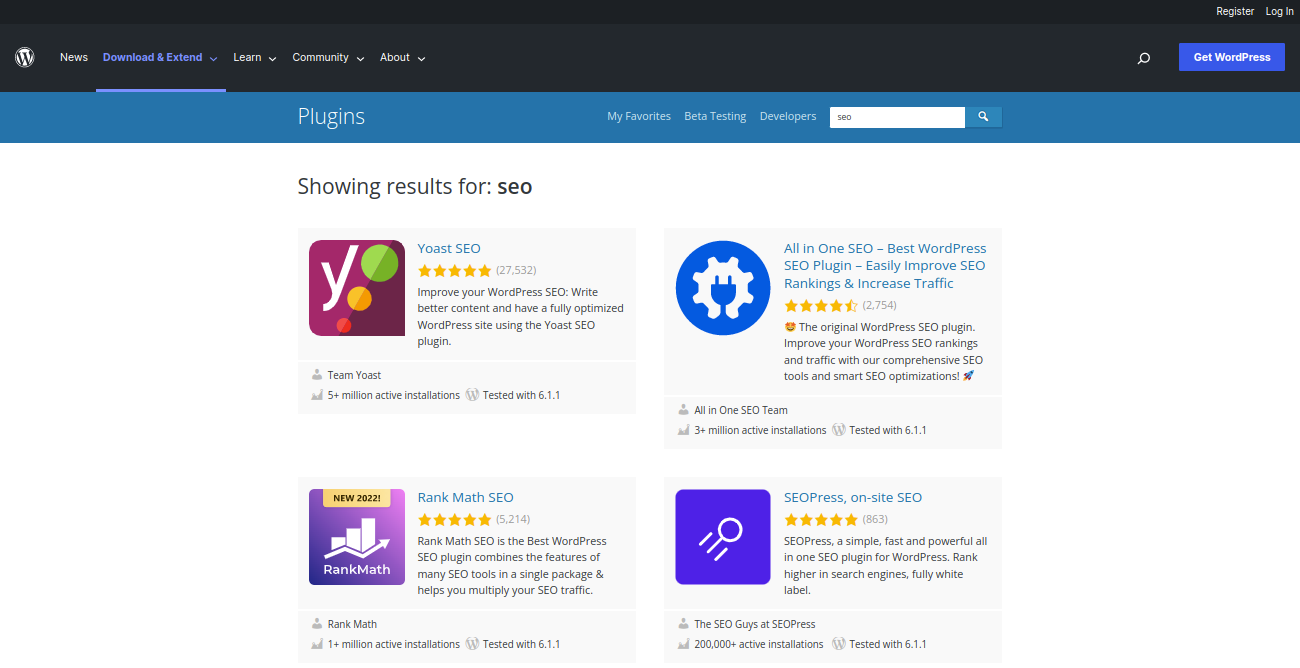
You can then simply download and install your WordPress plugin of choice to begin improving your SEO immediately.
5. Use XML Sitemaps
An XML sitemap is a file of code on your web server that includes each page of your website. XML sitemaps are used to help search engines find, evaluate, and rank the content on your site.
Unless you’re someone with extensive coding knowledge and want to manually create your XML sitemap, the easiest option is to install an SEO plugin, such as Yoast SEO, or one dedicated to creating sitemaps, such as Google XML Sitemaps, that creates your sitemaps for you automatically.
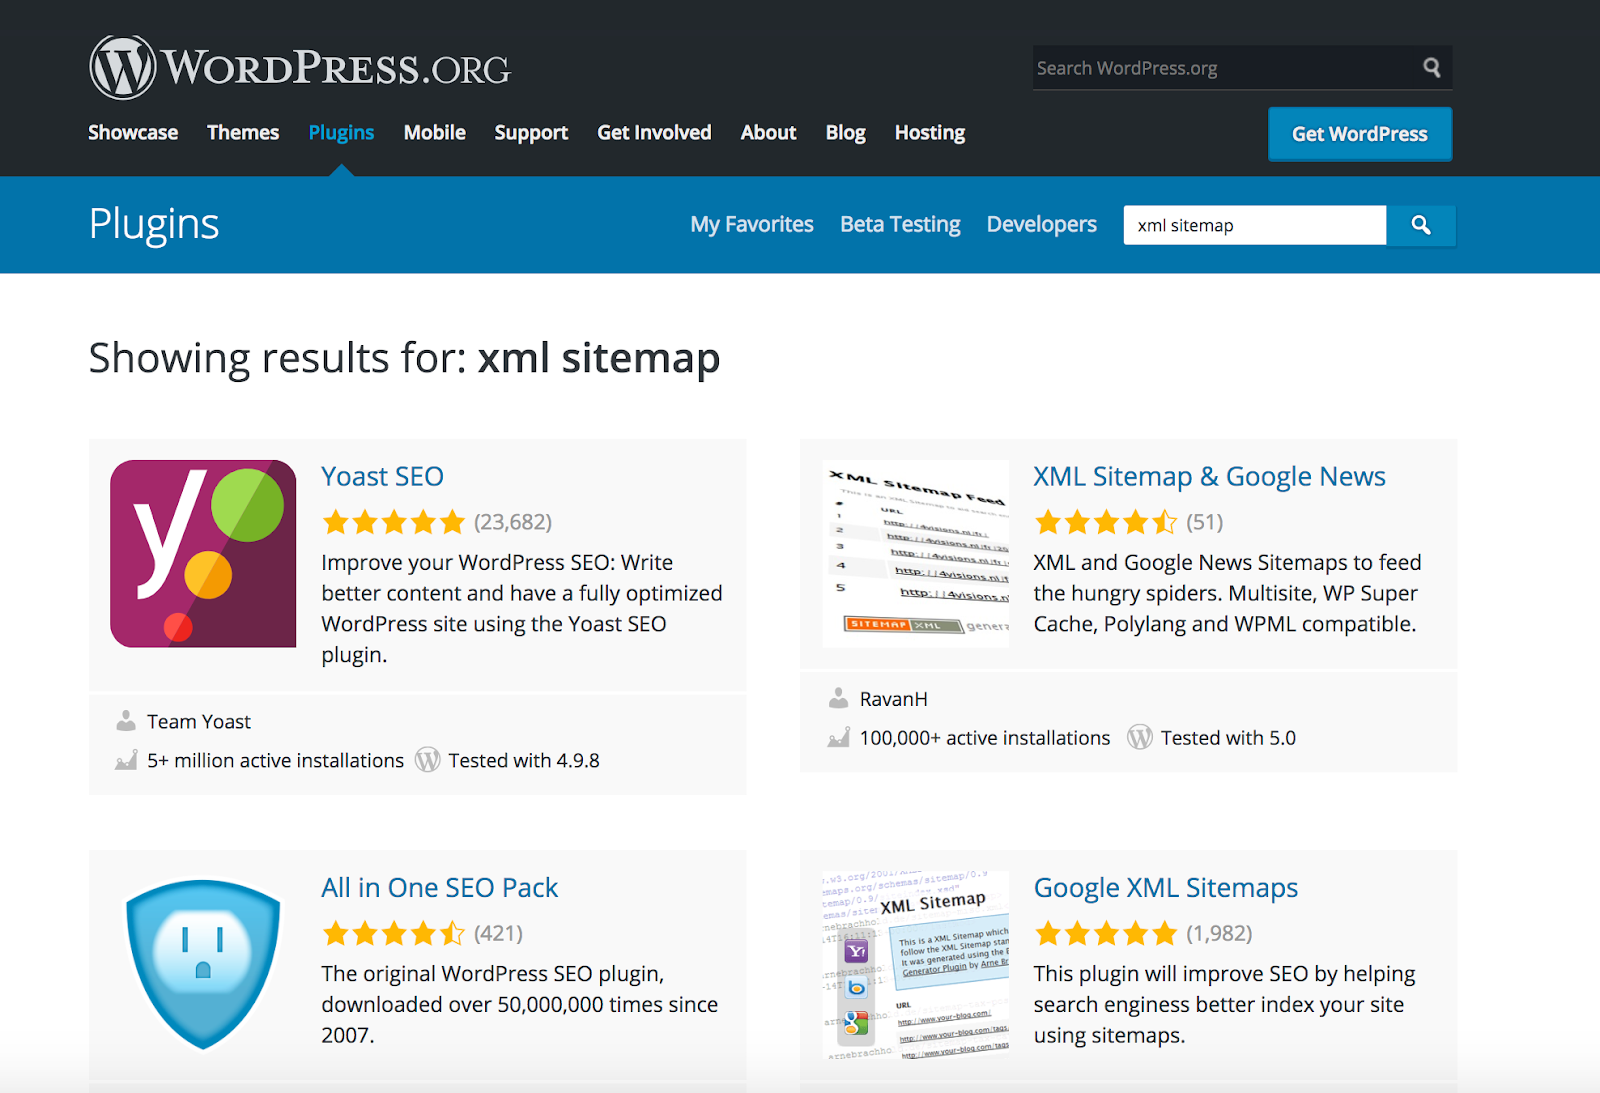
For more details on why WordPress recommends using a sitemap, check out this page.
6. Internally Link Your Site
To improve your SEO, you’ll need to increase your website’s authority. One of the main ways search engines determine your site authority is by the amount you internally link to your pages, posts, blogs, and other content.
To link to other content, you can highlight the words on your page where you want to insert the link, click the link button in the WordPress toolbar, and copy and paste the URL you want to link to. Once you do this, you’ll notice your linked words turn blue and contain the URL you want to redirect your visitors to.
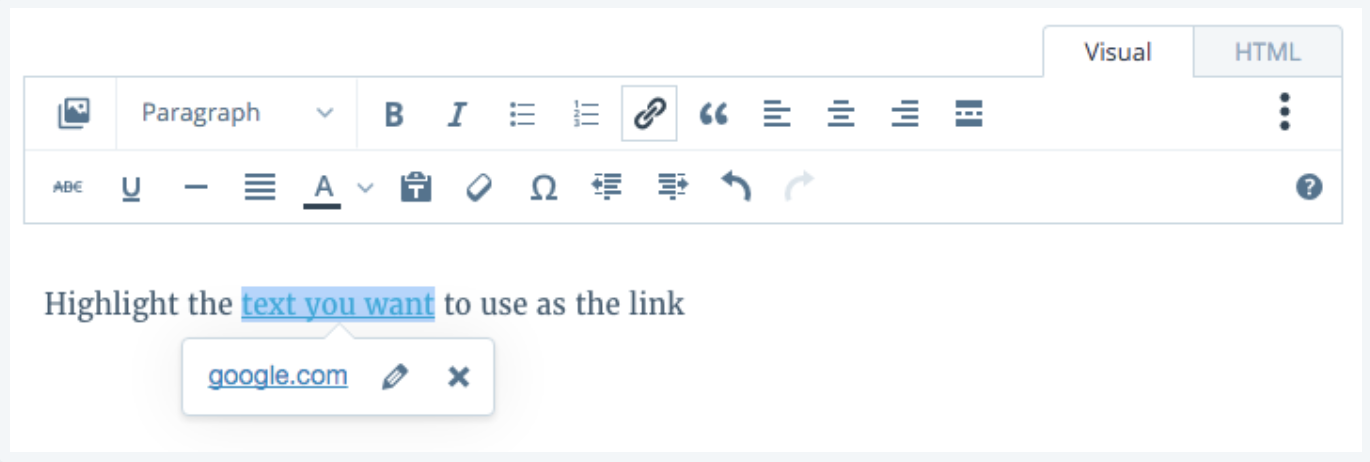
For other ways to internally link your WordPress website, check out this page.
7. Optimize Your Images
When it comes to optimizing images for SEO, there are a lot of things you can do, such as naming images strategically, using right alt text, image sitemaps, and ensuring that they are indexing properly with search engines.
Image file names
When you name your images you should always keep in mind that search engine bots and crawlers see them. You can't expect a computer algorithm to perfectly guess your images’ content, so we recommend naming your image file names something similar to your post's content and or keyword you are focusing on.
For example, in this article, our featured image is named "optimize-images-for-web" because that is the topic of this article. Always use hyphens when there are multiple words. Search engines, such as Google, sees hyphens as a separator. Don't use underscores, otherwise Google will read everything as one word.
Image alt text
Alt text, also known as alt tags, describe the image on the page. It should be short, yet descriptive. Below, check out our featured image and the alt text we chose. A lot of times, this ends up being similar to the file name.
<img src="/img/blog/optimize-images-for-web.png" alt="optimize images for web">
The alt text is also used by screen readers, the browsers used by blind and visually impaired people, to tell them what is on the image. Every image on a page should have alt text. Google also places a high value on them to determine how your image ranks and is related to the content on your page. If you are using a CMS like WordPress, there is a field to input the alt text when you upload your image. Otherwise, you can simply include them in your HTML as seen above.
WordPress allows you to easily add title and alt tags when you upload an image.
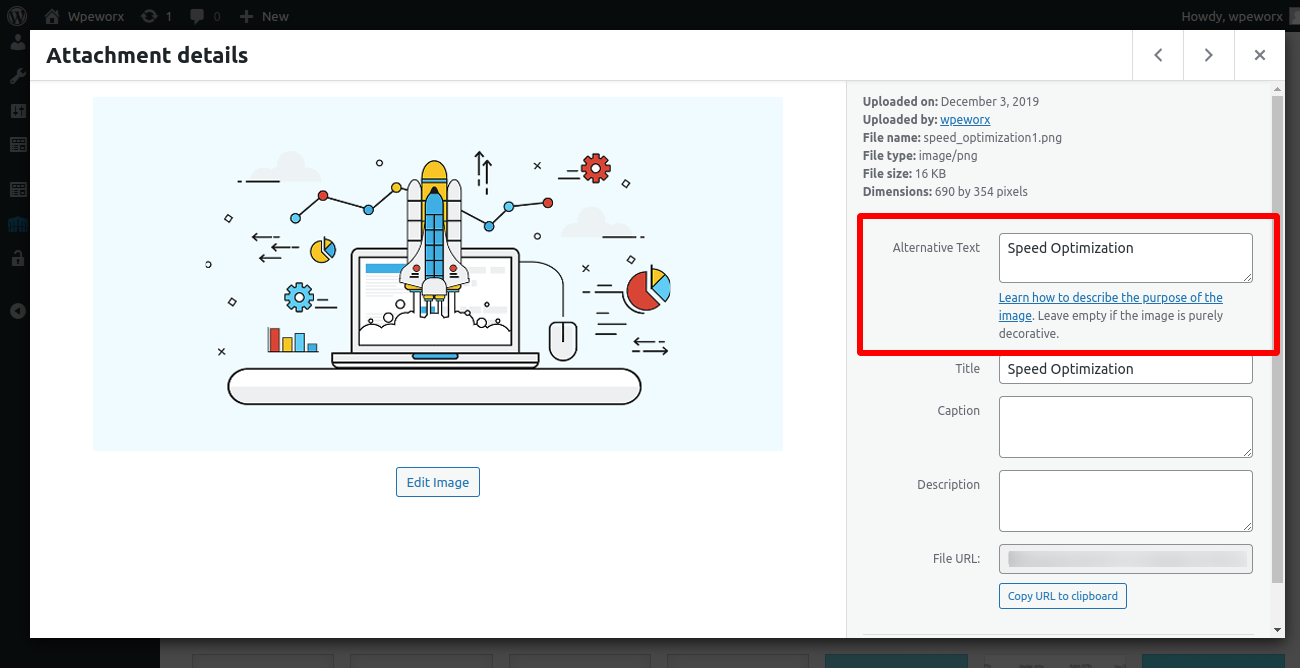
Image title tags
The image title attribute, also referred to as title tags, are not required by Google. However there has been some debate about this recently over on "Search Engine Roundtable" in a post called Google Does Index & Rank Images Title Attribute Tags. A tester ran a test with the word "plinkyploppitypippity" in the title attribute field and left the alt text empty. A few days later she found that Google had indexed her image for that term.
Now there are a few more things to consider here before going back and adding title tags to all your images. First, Google most likely puts higher priority on the alt text anyways, so even if you had both, the title attribute might not matter. A second thing to consider is that she used the term "plinkyploppitypippity" in her the body content of the post, which means it's possible Google may have associated her post content with the image and indexed it.
If in doubt, you can add the title tag, as it won't hurt anything.
Image sitemap
Image sitemaps provide information that helps Google discover images that they might not otherwise find (such as images your site reaches with JavaScript code), and allows you to indicate images on your site that you want Google to crawl and index. Sitemaps aren't necessarily required if your website is set up properly, but using them can also help you diagnose problems and dig deeper into data.
For example, you can check if your images are indexed by looking at the sitemap data in Google Search Console or by using the site search operator in Google. In this example we are using WordPress and the Yoast SEO plugin to create and submit our sitemaps. You can also use a third party tool like xml-sitemaps.com.
#1 In Google Search Console click into "Crawl" and then "Sitemaps".
#2 Click into your "Images" tab and you can see the number of images indexed out of the total submitted, within each of your sitemaps.
Indexing images
When it comes to Google finding your images, make sure they are indexing properly. One way to help troubleshoot is to use a sitemap file like we described above. Another is to ensure that the settings on your server and/or CDN are set up correctly. Search engines check for a robots.txt file at the root of a site. If the file is present, they will follow the instructions. If no file is present, they will scan everything.
Here is a typical robots.txt file that allows everything.
User-agent: *
Disallow:
#1 The first line defines the crawler the rule applies to. User-agent: * would apply for all bots, such as Googlebot, Bingbot, etc.
#2 The next line defines what path can be indexed. Disallow: tells the search engine to index everything by essentially "not allowing" nothing, or in other words, allowing everything.
8. Start using SSL
SSL, or Secure Sockets Layer, is a standard security technology that manages an encrypted link between a server and browser. SSL is how information shared between your website and visitors remains secure.
For example, if someone completes your order form and lists all of their credit card information, SSL is how businesses ensure that information is not intercepted by a hacker along the way.
SSL improves SEO because search engines, such as Google, look for “secure and encrypted” connections when determining a website’s ranking. So, if there were two identical sites but one had SSL and one did not, Google would be more likely to rank the site with SSL.
These days, WordPress.com automatically adds SSL to your site so you won’t need to manually do anything. If you have a different type of account, such as a WordPress.org site that requires you to take care of all of your website's security individually you can install an SSL plugin such as Really Simple SSL.
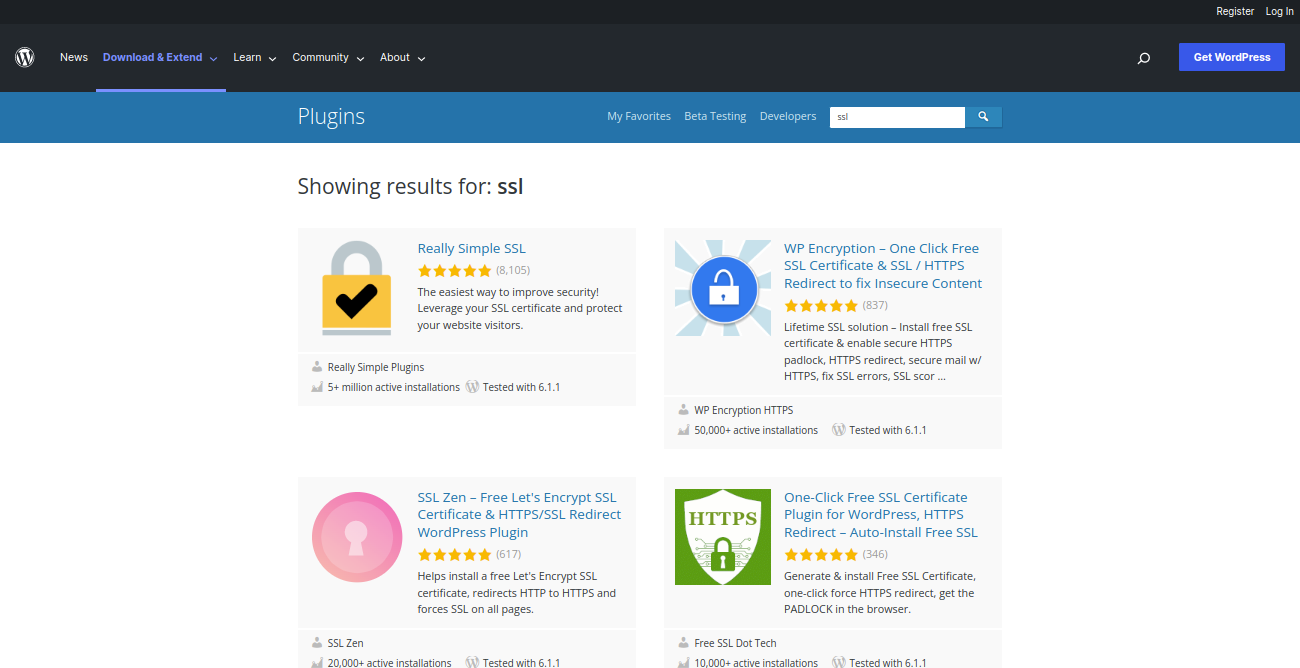
Check out this page for more details on WordPress SSL.
9. Use Nofollow in External Links
When you internally link to the pages on your site, you are giving yourself authority. When you externally link to your sources or other pieces of content you believe your visitors should read or experience, you are also helping them gain authority, or giving those websites “link juice”. So you could say externally linking is a good thing for your own SEO, but it also
improves the SEO of those pages you are mentioning on your website.
Adding the “nofollow” attribute to external links (links to websites that you don’t own) instructs search engines not to follow those links. This helps you save link juice.
A normal external link looks like this in HTML:
<a href="https://otherwebsite.com">Example Website</a>
An external link with the nofollow attribute looks like this:
<a href="https://otherwebsite.com" rel="nofollow">Example Website</a>
By default, WordPress does not come with an option to make links nofollow.
There are also a number of Nofollow plugins available for your WordPress site in the plugin library.
10. Manage Your Security
As mentioned in our discussion about SSL certificates, search engines love secure websites — meaning your website’s authority and ranking will improve if your site is secure.
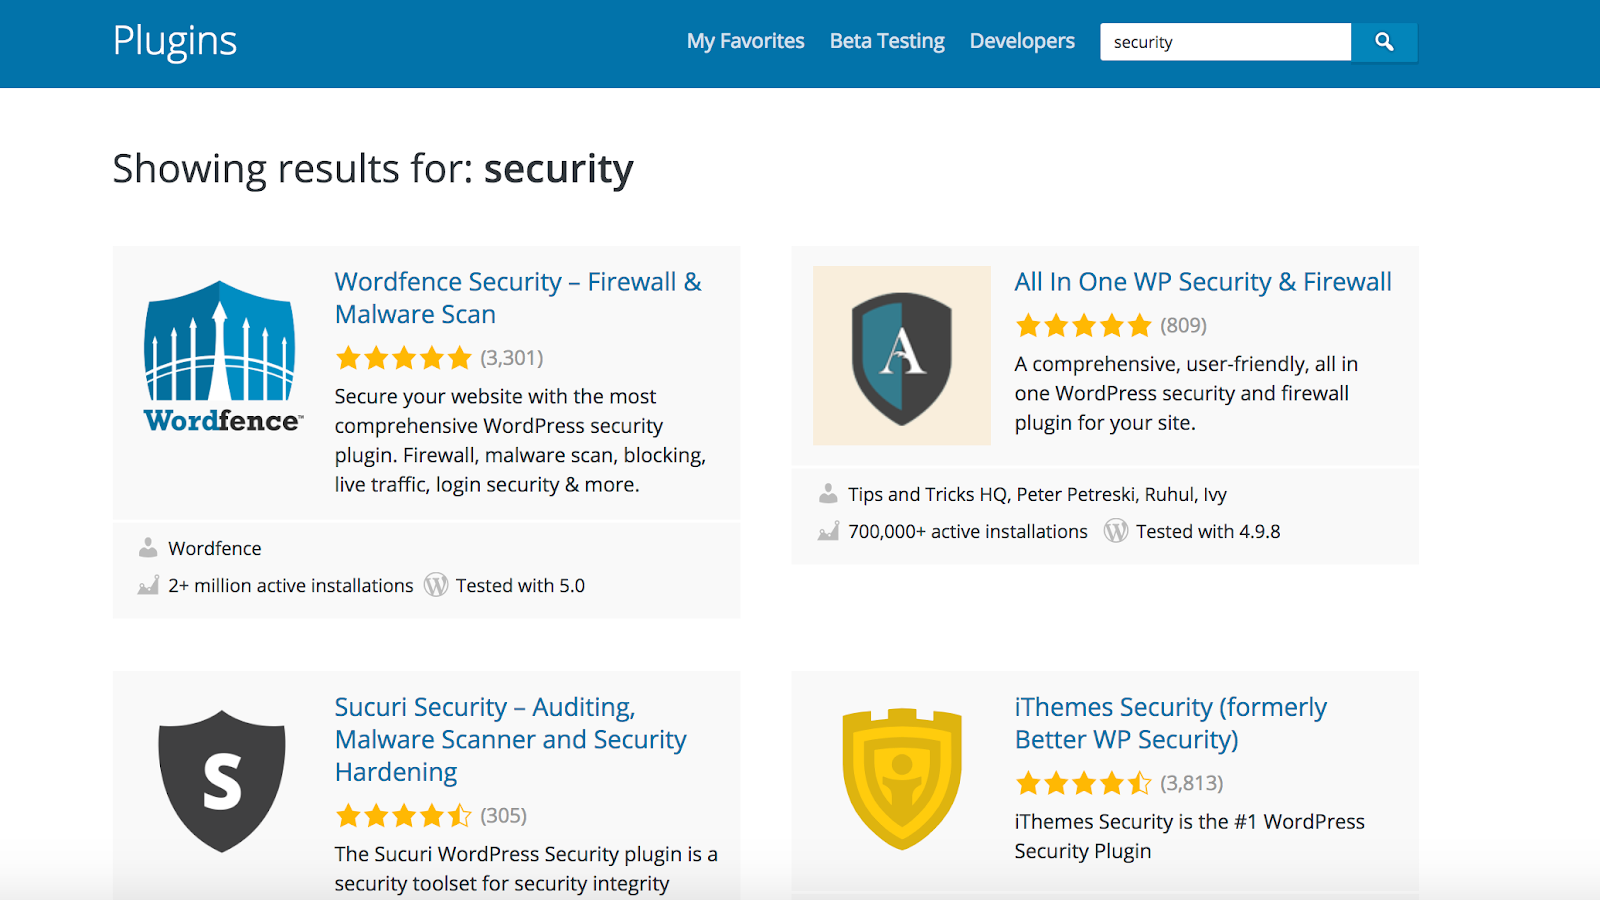
Depending on your WordPress plan, you may or may not have security taken care of for you. No matter what, you can always install plugins, such as Wordfence Security or iThemes Security, to enhance your site’s protection.
You can also read our article on How to improve your site security.
11. Optimize Your Comments
Comments on posts are a great way to boost engagement on your website. Engagement typically means more traffic, link sharing, and interaction, and therefore, improved SEO. However, spam in your comments could ruin your SEO and ranking. That’s why you need to ensure you are only receiving real comments from real people.
WordPress plugins such as Spam protection, AntiSpam, FireWall by CleanTalk & All-In-One Security (AIOS) – Security and Firewall will block comments containing spam and stop other forms of spam such as faulty form submissions, subscriptions, orders, and more.
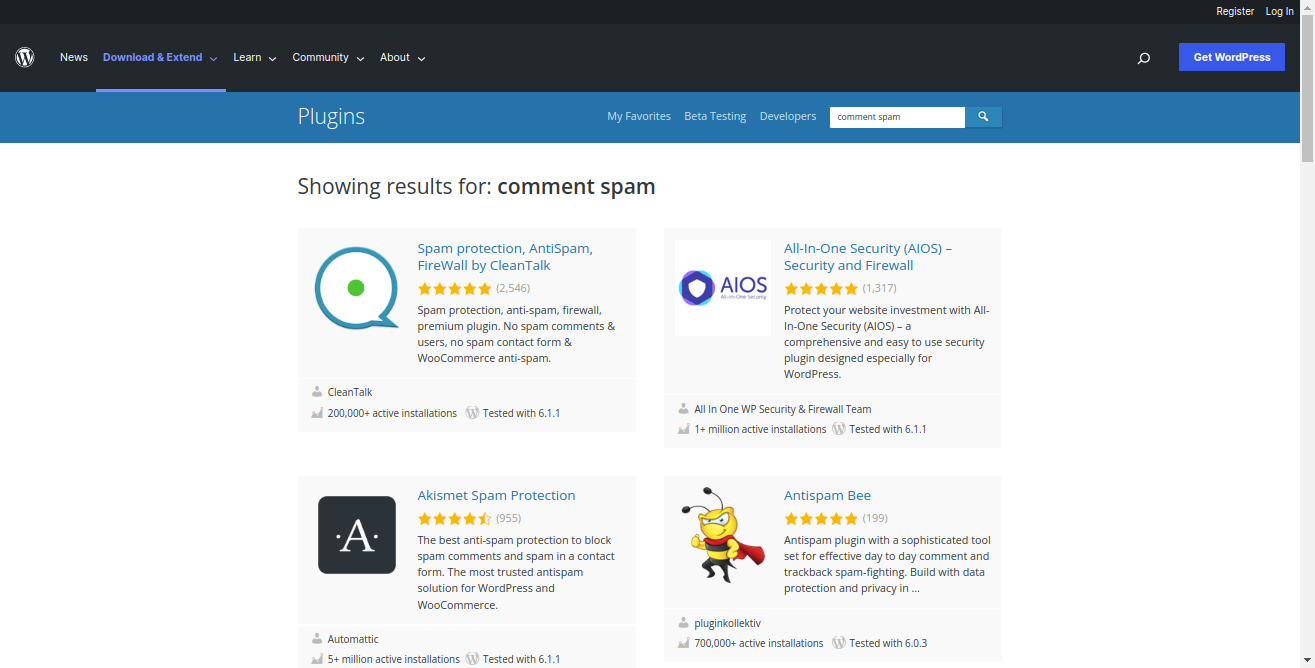
Many of these plugins also have features that completely block the known spammers so they can’t return to your site again.
12. WWW vs non-WWW
There are two main ways to access websites by URL — you can either search with the ”www” (so your search would look like this: www.yoursite.com) or without the “www” (so your search would look like this: yoursite.com).
Search engines see these two different URLs, or official domain names, as completely different websites … which is why you need to pick one. There’s no good or bad option and your decision will not impact your SEO — it’s just a preference.
Once you do pick an option, you’ll want to stick with it so you can then begin improving your site’s SEO. You can do this by linking to your official domain name internally as well as externally on social media and email. When you are consistent with your domain and link to it often, search engines are likely to give you more authority and therefore a higher chance at ranking. Not to mention this makes things a lot simpler for your visitors.
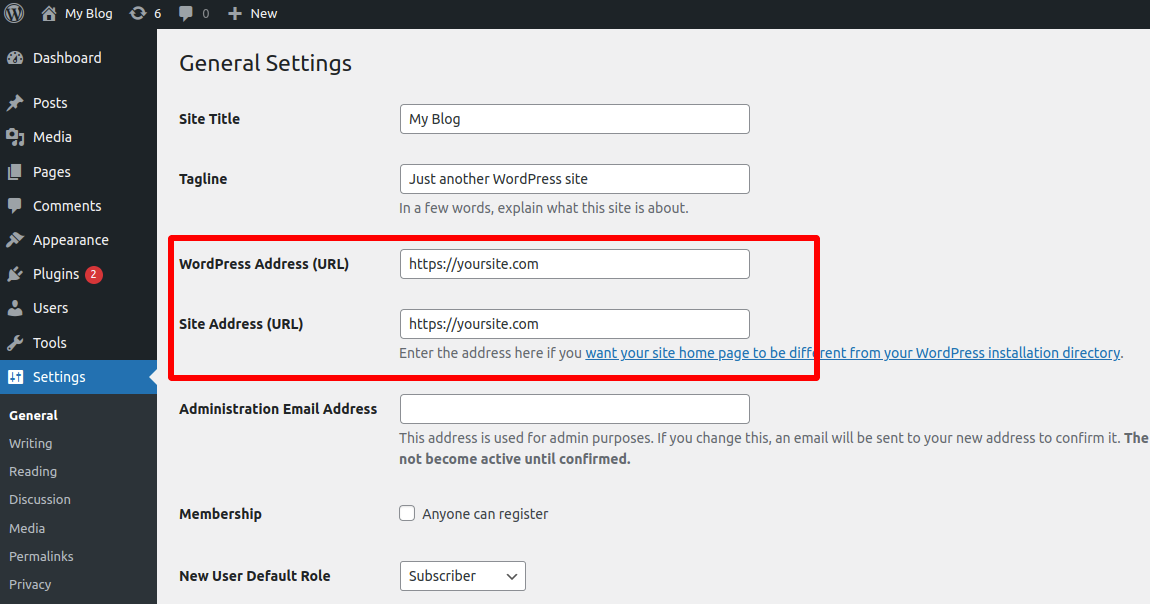
To pick an option, head to your WordPress dashboard, click “Settings” and under “General Settings” you’ll see the form fields for your URL.
Best SEO for Your CDN
Search engine crawlers (also known as bots or spiders) scan your website whether you like it or not. They scan pretty much everything that's available, which is normally a good thing. Why is SEO with CDNs so important? As you start using a CDN, your content can appear from different domains. Nothing wrong about that as long as the search engines have clarity about your content. If the content is not clearly declared, they will penalize you for duplicate content.
We offer two options to reach the best SEO. Both options fulfill the goal of not having duplicate content and be aligned with search engines. Let's take a closer look on both solutions.
1. Canonical URLs
An extra HTTP header added to your Zone lets the crawler know, that the content from the CDN is only a copy. Once we add rel="canonical" to the HTTP header, we're on the safe side. Crawlers are aware that this is only a copy.
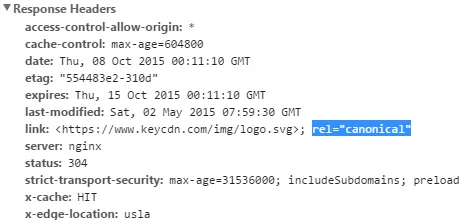
The rel="canonical" header will be applied to the entire Zone. If you already send a canonical header from your origin server, there is no need to enable it in the dashboard.
In KeyCDN when a new Zone is added the Canonical Header feature is automatically set to enabled. This setting can be set to disabled instead if you don't want this response header added.
2. Robots.txt file
Search engines check for a robots.txt file at the root of a site. If the file is present, they will follow the instructions but if no file is present, they will scan everything. In KeyCDN when a new Zone is added the Robots.txt feature is automatically set to disabled. This means the robot.txt file on the origin server is applied.
If this setting is set to enabled instead the following robots.txt file will be applied:
User-agent: *
Disallow: /
#1 The first line defines the crawler the rule applies to. In the example above, the robots.txt applies to every crawler. User-agent: Googlebot would only apply for Googlebot.
#2 The next line defines what path can be indexed. Disallow: / tells the search engine to not index anything.
To customize the default value shown above you can add your own rules with the Custom Robots.txt feature.
When you throw a CDN into the mix there are a few additional things you have to enable. Since a CDN copies your assets you need to tell Google that. You can do that by adding a canonical header which lets the Google crawler know that the content from the CDN is a copy. Once you add rel="canonical" to the HTTP header, your images will index normally.
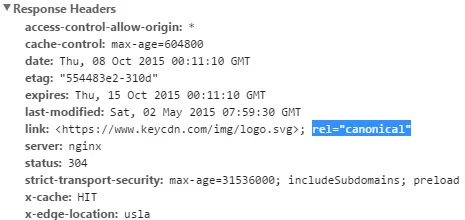
If you are using WordPress and your CDN images start to get de-indexed from your Google Search Console account, this is likely a sitemap structure issue. Assuming you are using the Yoast SEO WordPress plugin, you may need to add a snippet at the top of your functions.php file.
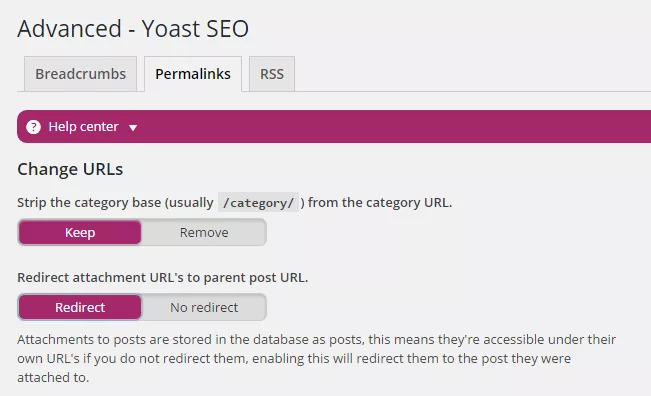
Another thing to consider if you are using Yoast is sometimes your image attachment pages might start indexing. Each image you upload to WordPress is housed on its own attachment page URL. You definitely don't want people seeing those, especially Google. One way to quickly fix this is to simply go into the Advanced Yoast SEO settings and enable the "Redirect" for attachment URLs.
Related Posts
Backup & Clone
Cloning a WordPress site lets you create an exact copy for testing, migration, backups, or development. This guide explains why site cloning is useful and walks you through the process step by step.
How To Create Custom Elementor Blog Post Template
A well-designed blog page can boost engagement and strengthen your content marketing efforts. With Elementor, you can create a custom blog template from scratch or customize prebuilt layouts to showcase your content in a more attractive and user-friendly way.
WordPress Filters
Search filters make it easier for customers to quickly find products in large eCommerce catalogs, improving the shopping experience and increasing the likelihood of conversions. This article explores the benefits of search filters and highlights WordPress plugins that can enhance your online store.

How To Use Ajax in WordPress
Ajax makes WordPress websites more interactive by enabling real-time updates without reloading the page. With the help of Ajax-powered plugins, you can easily add dynamic features that improve user engagement and create a smoother browsing experience.