Steps to take manual Backup and Restore for your wordpress site
Steps to take manual Backup and Restore for your wordpress site
Steps to Take a Manual Backup and Restore Your WordPress Site
WordPress makes it easy for anyone to launch a blog or website, but that simplicity can be deceptive when it comes to security. Keeping a fresh backup is one of the most important things you can do to keep your site running smoothly, since every website, no matter how well protected, is exposed to hacking, DDoS attacks, data theft, and data loss.
When Might You Need to Restore WordPress from a Backup?
You won't need to restore your site often, but when you do, it's important to do it correctly. A few common situations call for a restore:
- A plugin or theme update damaged your website
- Your site was hacked and your database or files were corrupted
- You prefer an earlier version of your site over a recent redesign
- Your site's functionality broke after significant changes
Testing changes on a staging WordPress site before pushing them live can help you avoid most of these situations in the first place.
How to Back Up a WordPress Site
WordPress sites can be backed up in a few different ways, manually, with a free plugin, or with a paid plugin. The right choice depends on what you value most: cost, convenience, or coverage.
Manual WordPress Backups
Manual backups give you a complete, comprehensive copy of your site, but you need to run them yourself on a regular basis. This option is time-consuming, and human error is possible, so it's easy to accidentally save an incomplete copy of your site.
Paid Plugins for WordPress Backups
A paid backup plugin is a good fit for businesses that want to save time. It's typically more straightforward and protects your entire site, unlike free options that sometimes cover only part of it. The trade-off is the added cost of another plugin subscription.
Free Plugins for WordPress Backups
Free plugins make backups faster and easier when you don't have the time or resources to do it manually. However, most free plugins cap how much data they collect, which can mean only your database gets backed up, not your media files or theme. Pairing manual backups with a free plugin, or upgrading to a paid service, helps avoid that gap.
How to Back Up WordPress Using a Plugin
WordPress doesn't include a built-in way to back up your site, which is where plugins come in: small pieces of software that add functionality without requiring any code. Among the many backup plugins available, UpdraftPlus is one of the most popular, and we'll use it for this walkthrough.
To complete a WordPress backup using UpdraftPlus, follow these steps:
- Log into your WordPress dashboard.
-
Navigate to the Plugins tab, then click Add New.
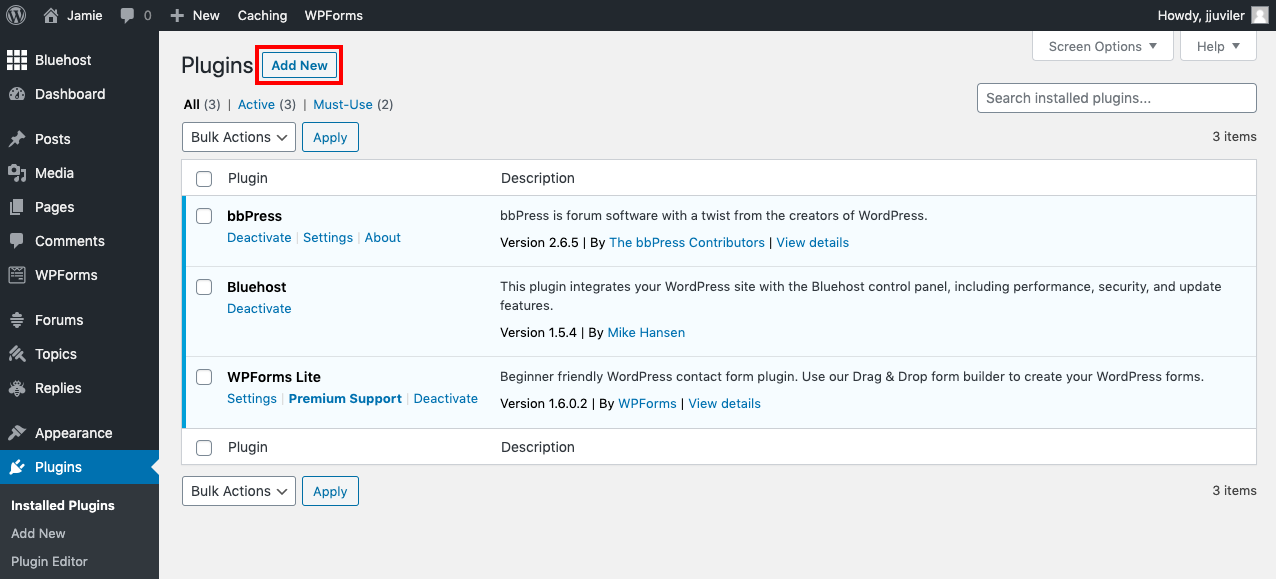
- Search for "UpdraftPlus" and click Install Now once it appears in the results.
-
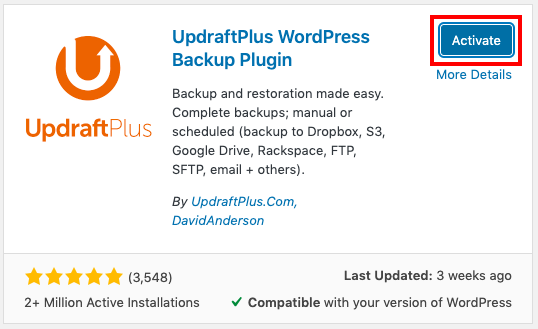
Click Activate. You'll be redirected to the tab listing all plugins installed on your site.
-
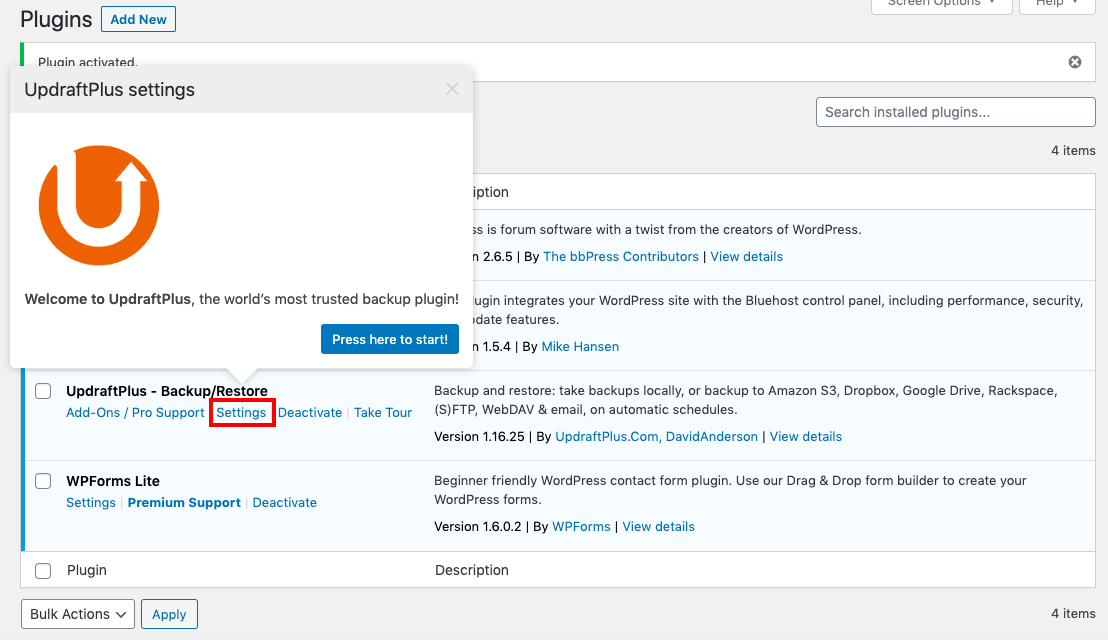
Configure the plugin's settings. A pop-up with a Start button may appear; if not, click the Settings link.
-
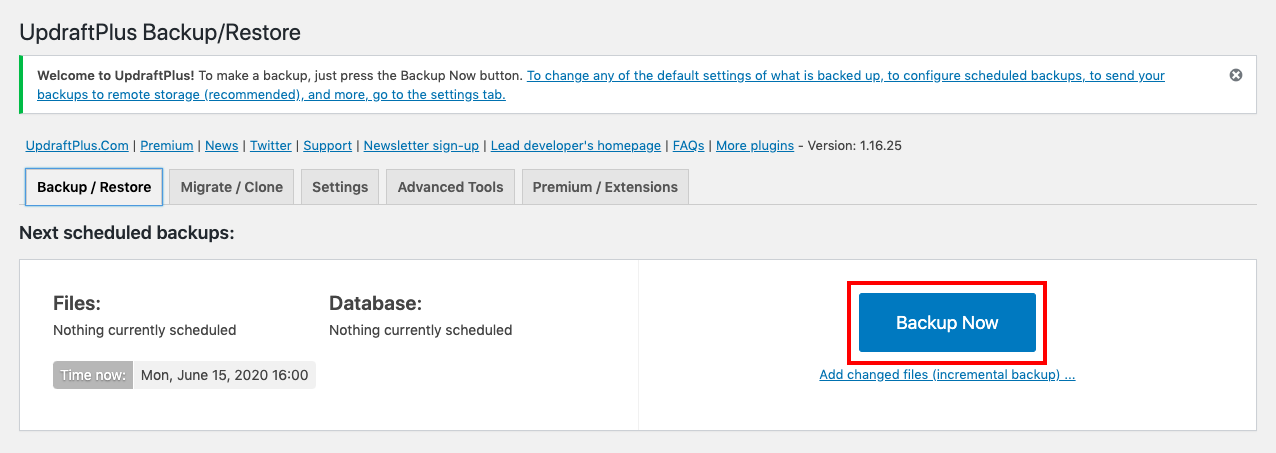
Click Backup Now to run a backup immediately.
-
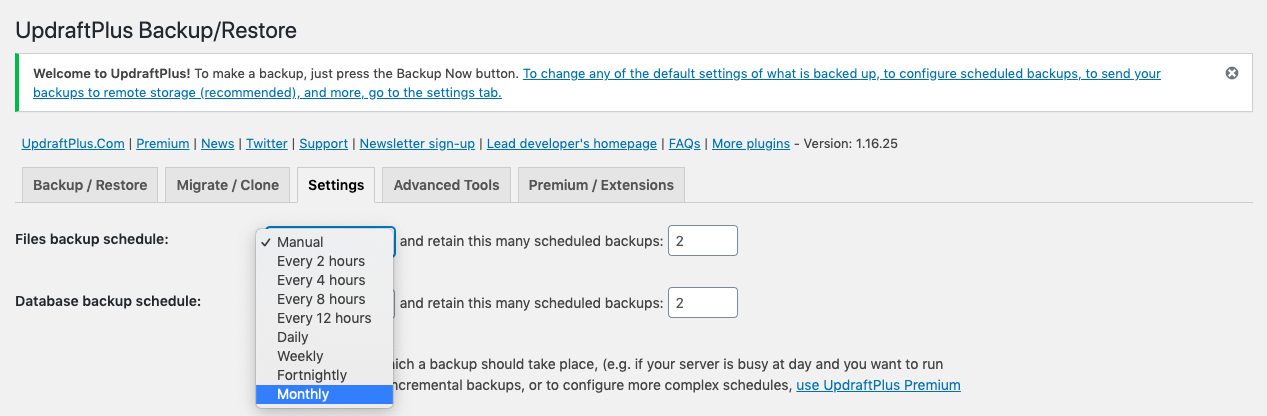
Set a backup schedule under the Settings tab if you'd like automatic backups.
-
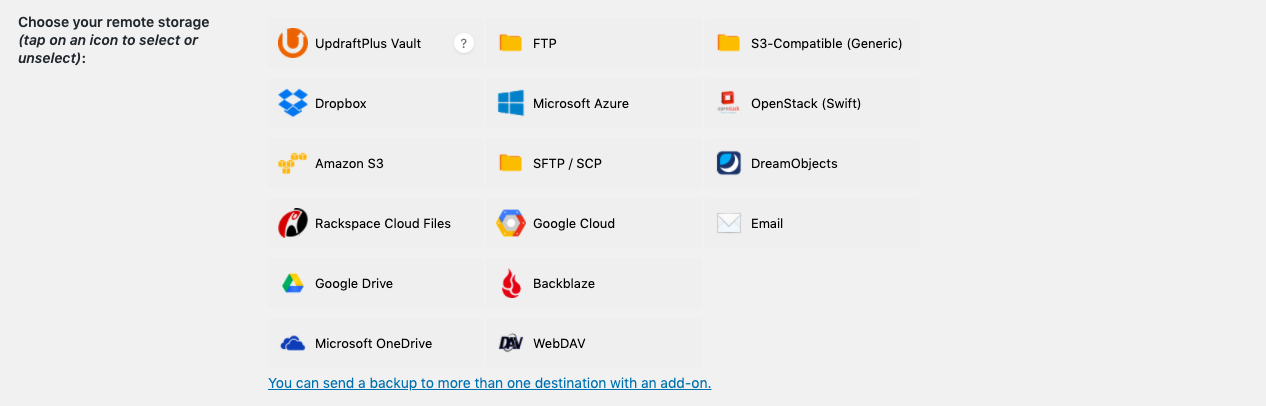
Choose a remote storage provider for your backups. This example uses Dropbox.
-
Save your settings. A new section will appear with a link to authenticate your account with the provider — no action is needed yet.

-
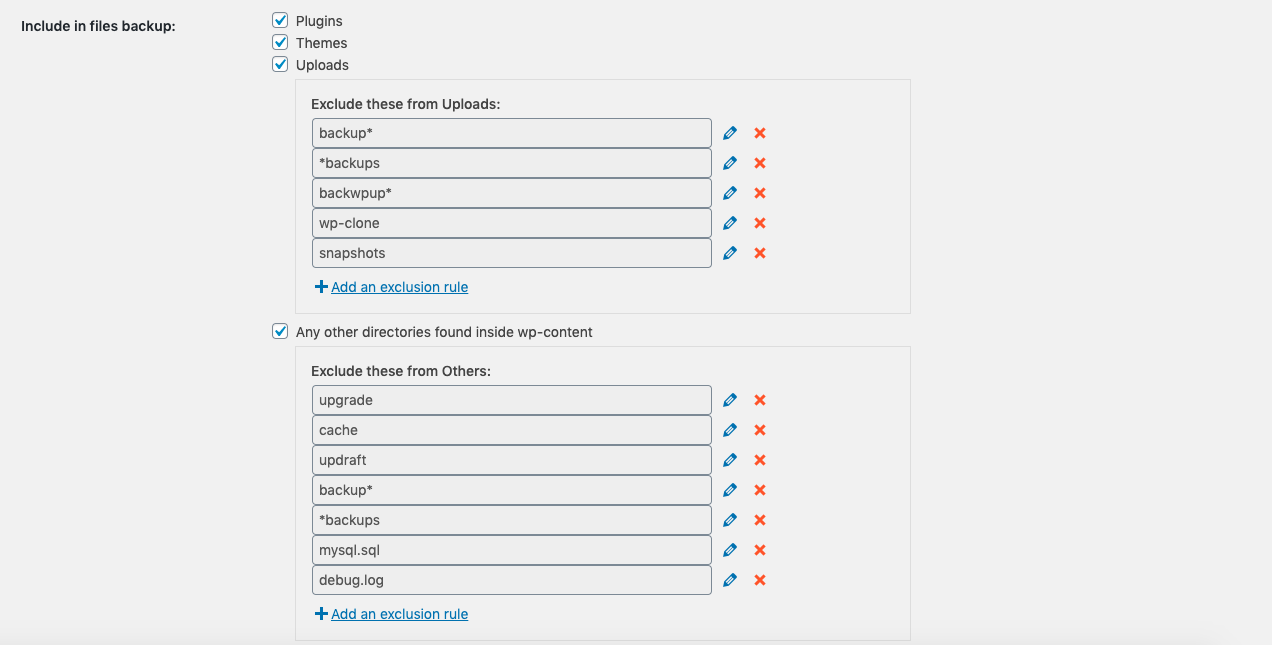
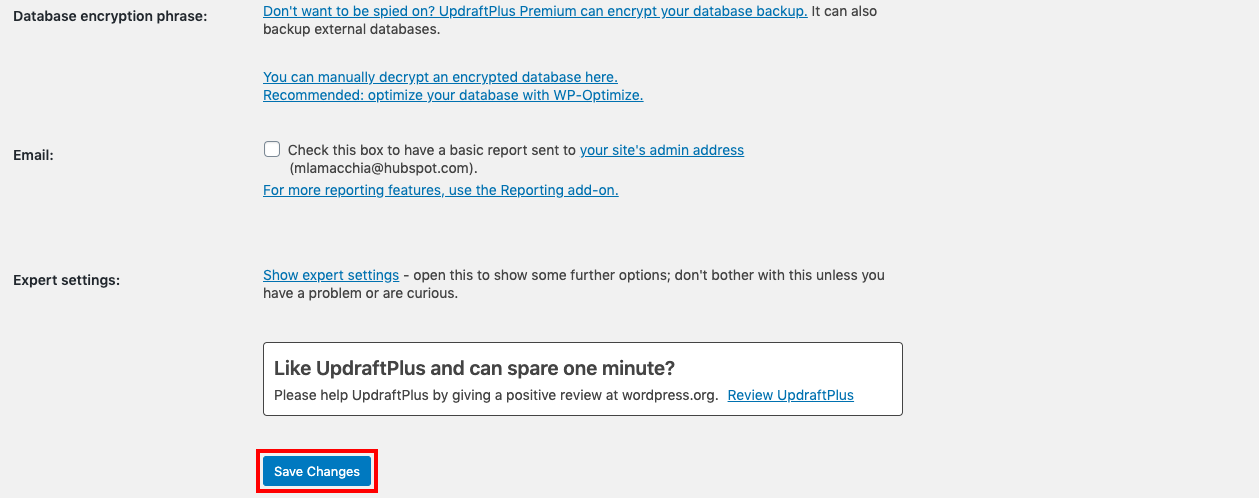
Select which files you want to include in the backup.
-
Click Save Changes to save your settings.
-
Your remote provider will prompt you to verify your account after you click Save Changes.
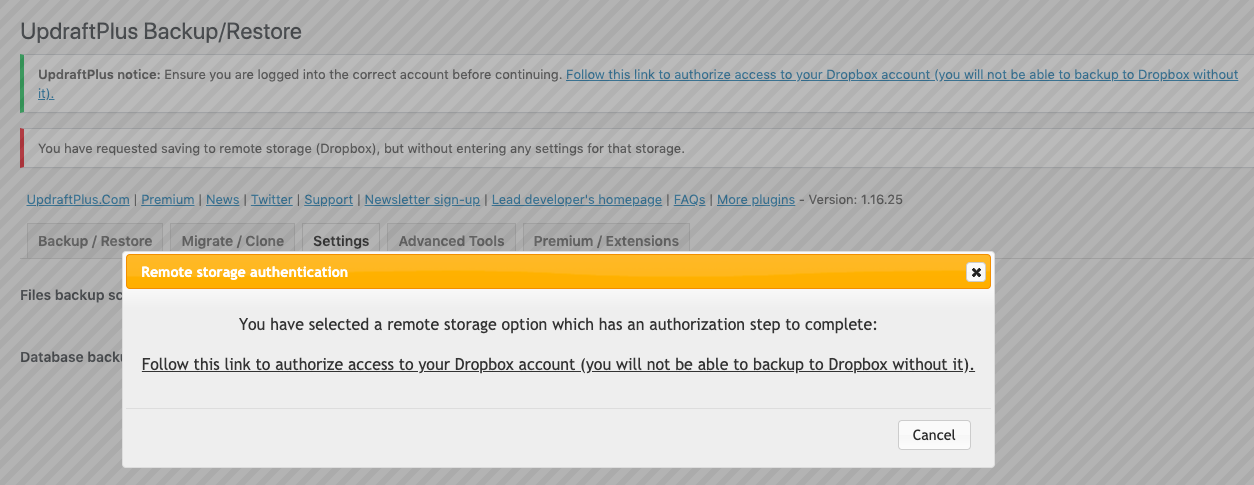
-
Click the verification link. A new window will open asking for your account credentials.

-
Click Complete Setup to grant UpdraftPlus access to your remote provider.
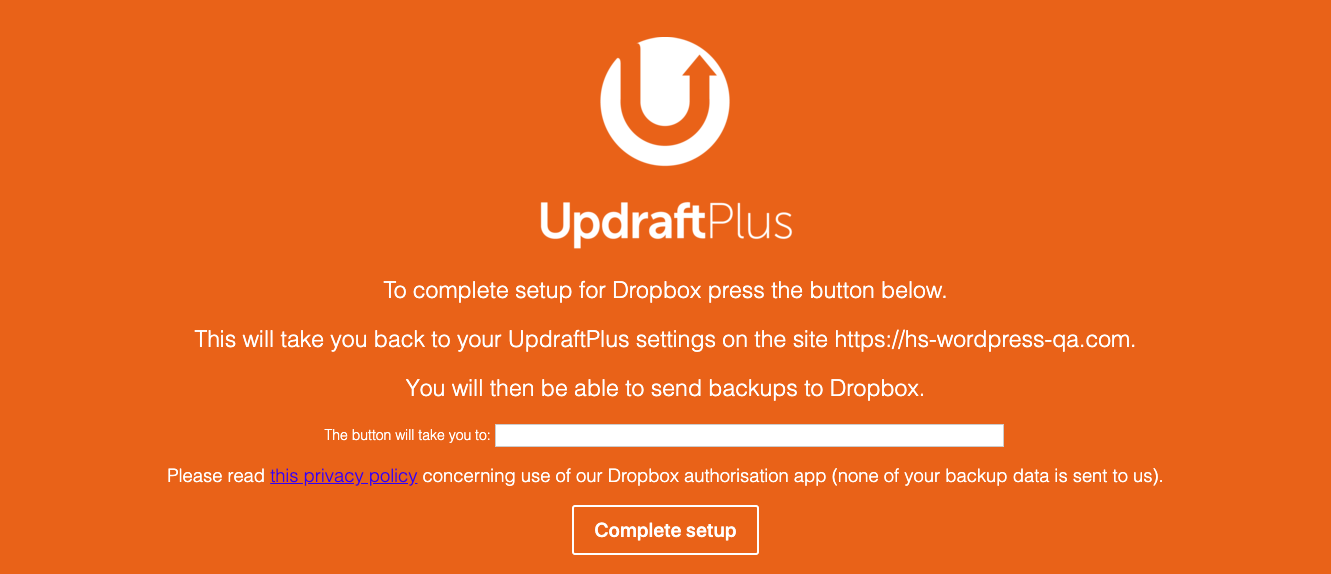
-
Once authenticated, you'll be redirected back to your WordPress dashboard.

This sets up UpdraftPlus for ongoing backups, but WordPress's own documentation still recommends running a manual backup occasionally, even with a plugin in place.
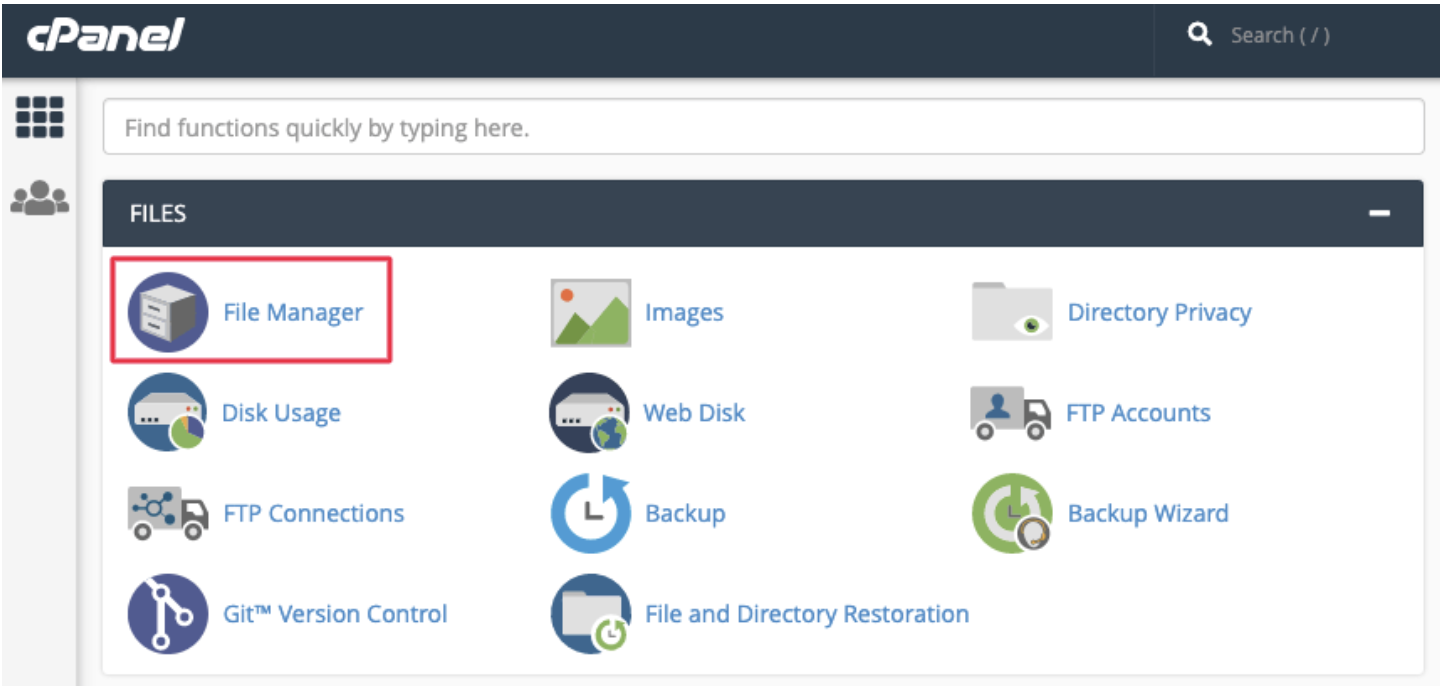
Backing Up Files Manually with cPanel
Most hosting providers offer cPanel for managing your website, and its File Manager makes backing up files straightforward:
- Log into your cPanel account (usually at www.yourdomain.com/cpanel).
-
Under Files, click File Manager.
- Locate the public_html folder in the left panel, expand it, and select the folder for your website.
- Right-click the folder and select Compress to reduce the time it takes to save the backup.
-
Click Compress File(s) to create the zip archive.
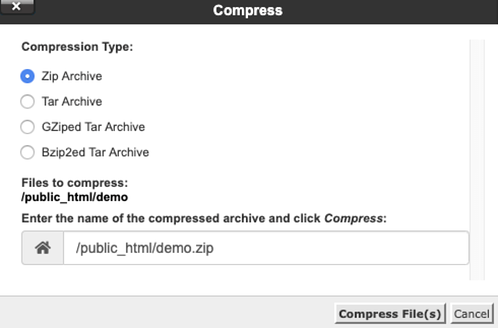
- The zip file will download once compression finishes.
- Move your backup to a secure location on your hard drive.
Backing Up Files Manually with FTP
If FTP is your only option, here's how to download your files from the server with an FTP client:
- Find your application credentials. This includes your server's IP address, hostname, username, password, and sometimes a port number — usually available on your host's dashboard. On Cloudways, for example, these are listed under Application Credentials in the Access Details section. If you haven't created credentials yet, set a username and password, then copy the IP address, username, and password.
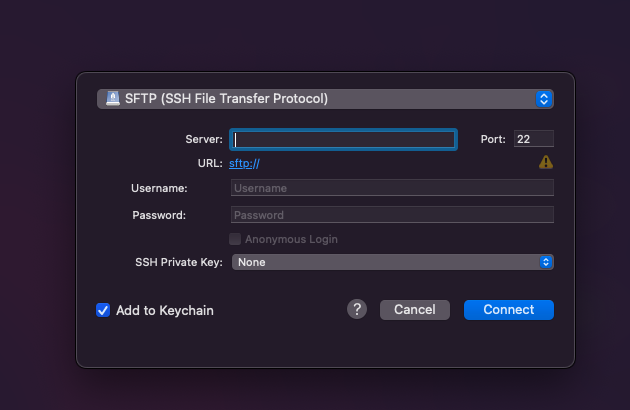
- Set up an FTP client. FileZilla and Cyberduck are both common choices; this example uses Cyberduck.
-
Connect to your server. Click Open Connection, select the correct protocol from the dropdown (SFTP in this case), paste in your credentials, and click Connect.
- Back up your files. Your site files live in the public_html folder in the root directory. Back up whatever you need — larger sites will take longer to transfer.
Backing Up Files Manually with SSH
This method is lengthy, and we'd only recommend it if FTP and cPanel aren't available. You'll need terminal access along with your username, password, and server IP.
Install WP-CLI. Depending on your machine, this may require installing PHP and command-line tools first, along with a package manager such as Homebrew.
Create a local folder. Set up a folder on your device to store both your file and database exports together, which makes restoring easier later. Copy its path for reference (on a Mac, select the folder, choose View > Show Path Bar, then right-click the path to copy it).
Download the files to your local folder. In your terminal, run:
scp -r username@serveraddress:rootfolder localfolderUse the full path for both the root and local folders. You'll be prompted for your password, after which your entire root folder downloads to your local drive.
How to Back Up the WordPress Database Manually
With your files backed up, the next step is backing up your database. You can do this either through phpMyAdmin or via SSH.
A. Backing Up Your Database with phpMyAdmin
phpMyAdmin is typically accessible through cPanel. If your host doesn't offer cPanel, a tool such as Adminer serves a similar purpose; the overall process is much the same either way. The goal is to export your entire database to a single SQL file.
- Access phpMyAdmin from the database section of your hosting dashboard. Some hosts, like Cloudways, provide their own database manager instead, accessible through Access Details.
-
Locate the right database. Open the Database tab and choose the database you want to export — you can find its name in your wp-config.php file.
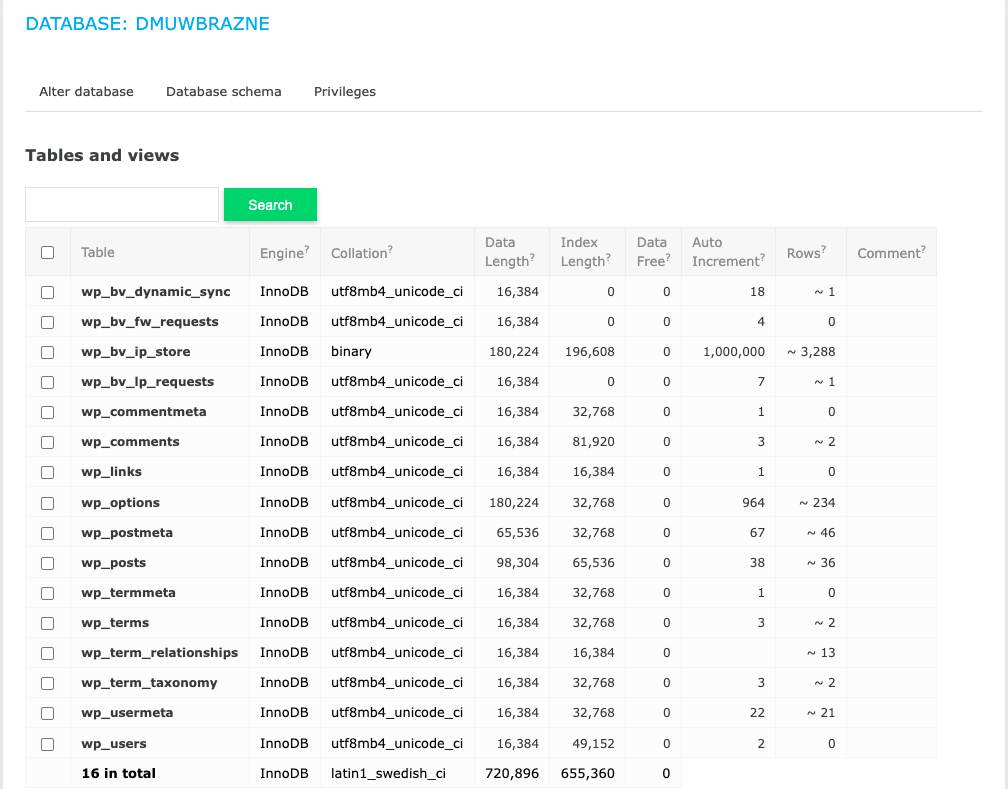
- Export the database. Select all the tables and click Export.
B. Backing Up Your Database with SSH
You can also export your database to an SQL file over SSH, provided WP-CLI is installed.
-
Navigate to your wp-config.php file, usually found in your site's root directory, then run the following command, replacing the filename with one of your choosing:
wp db export filename.sql -
Download the file to your local machine with:
scp username@serveraddress:rootfolder/filename.sql localfolder
Keep your file and database backups together. Restoring a WordPress site requires both at the same time — using only one risks a critical error on your site.
How to Manually Restore a WordPress Website from a Backup (In 5 Steps)
Before restoring your site manually, make sure both your file backup and database backup are saved to your local computer. Even without much FTP or phpMyAdmin experience, you should be able to follow the steps below.
Step 1: Log in to Your Hosting Account and Open phpMyAdmin
Log into your hosting account and open phpMyAdmin, the database manager WordPress relies on. In cPanel, you'll find its icon under Databases.
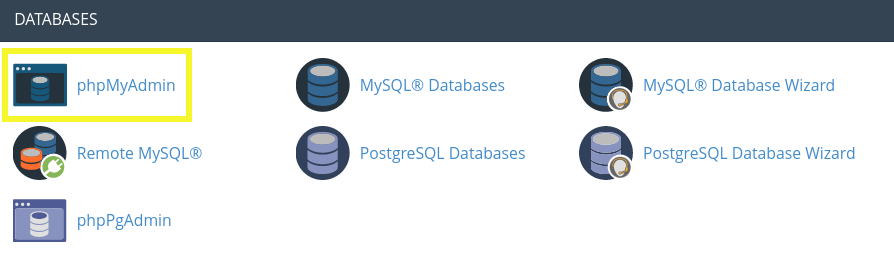
If your host uses a different control panel, phpMyAdmin should still be available — check your provider's documentation. Once it's open, navigate to the Databases tab.
Step 2: Import Your Backup Database
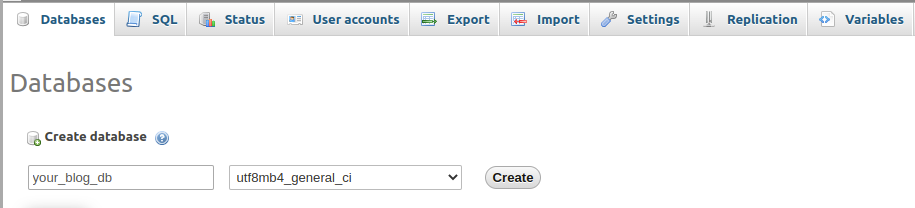
To restore your database, you can either empty the existing one and import your backup, or delete it and create a new one. If you choose the latter, remember to update your new database credentials in wp-config.php.
After locating the database you want to restore, click the Import tab at the top of the screen:
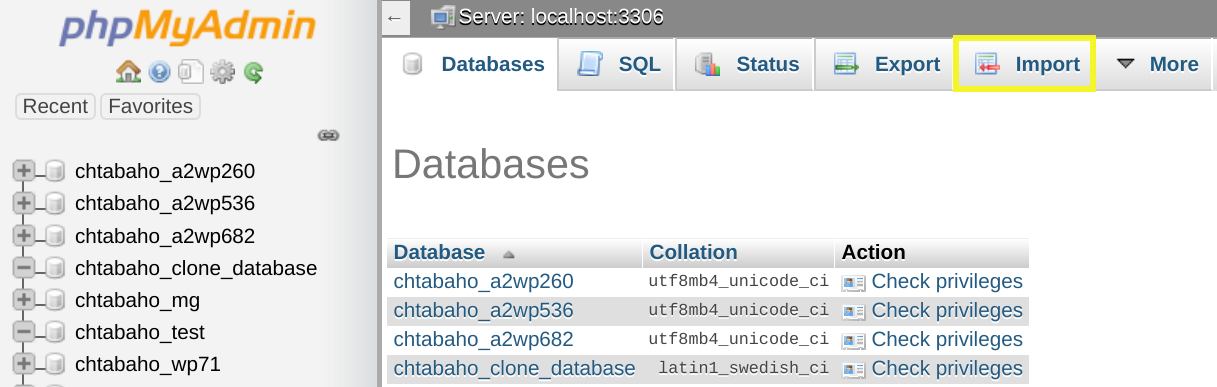
Click Choose File and select your backup database under File to Import:
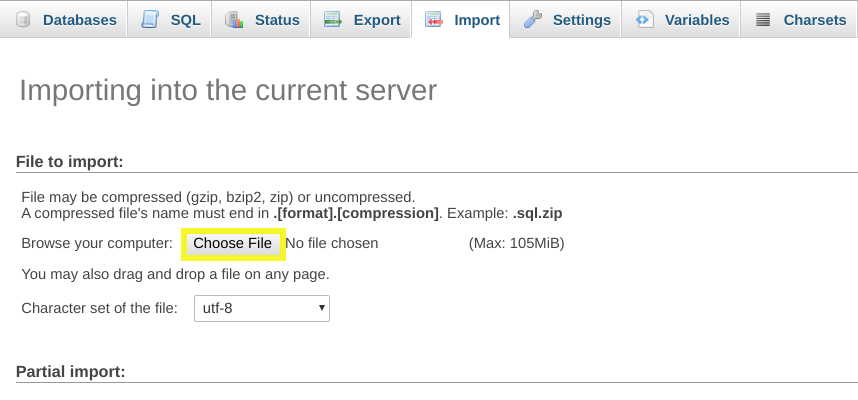
Under Format, choose SQL from the dropdown:

Then click Go. The import may take a few moments, but once it finishes, your posts and pages should be accessible again.
Step 3: Install and Log in to Your FTP Client
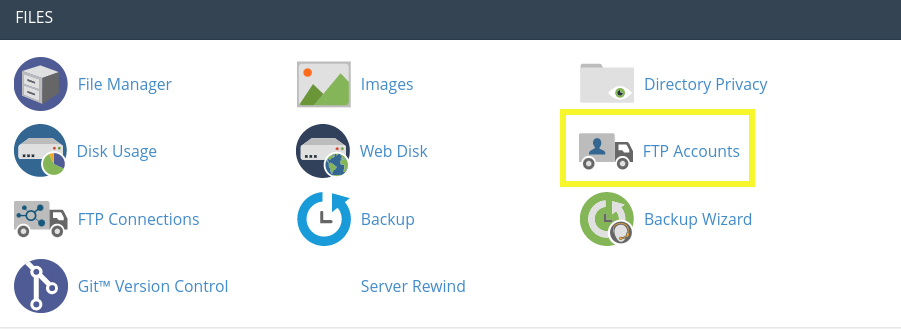
With your database restored, the next step is your WordPress files. You can restore these through your hosting provider's file manager or an FTP client such as FileZilla:
For the FTP route, you'll need your FTP credentials from your hosting account — where to find them depends on your provider's control panel. In cPanel, click FTP Accounts under Files:
After installing FileZilla, log in with your credentials and click Quickconnect:
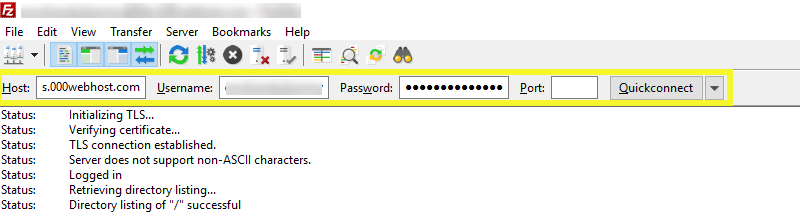
You'll know the connection succeeded once the directory listing for "/" updates successfully.
Step 4: Upload Your WordPress Backup Files
FileZilla shows your local files on the left and your server, the "remote site," on the right. Make sure your backup is unzipped and accessible on your computer before you start:
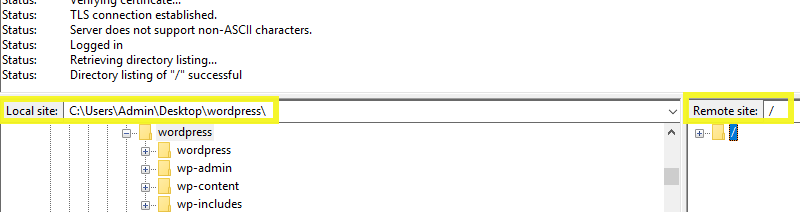
Delete the old files from your server first by right-clicking them in FileZilla — just make sure your backup already includes any custom code you want to keep, since it won't be recoverable otherwise.
Then upload your backup by dragging and dropping it from your local computer into FileZilla (other FTP clients typically offer an equivalent Upload option).
FileZilla tracks transfers across three tabs at the bottom of the screen: Queued files, Failed transfers, and Successful transfers. Files move from Queued to Successful as the upload completes — once the queue reaches zero, your restoration is done. Larger sites will naturally take longer.
Step 5: Verify That Your Site Was Restored Successfully
Once your files have transferred, check your website to confirm everything is working as expected.
Verify that your plugins came across correctly — some may need to be reinstalled or reactivated.
If your permalink structure changed, your page and post links may break. Go to Settings > Permalinks in your WordPress dashboard to confirm they're set up correctly:

It's also a good idea to change your WordPress admin password at this point, and consider requiring new passwords for all users, including any Multisite network — especially important if the restore followed a hack.
Finally, this is a good time to put additional security and backup measures in place. With any luck, you won't need to restore your site again, but if you do, you'll know exactly what to do.
Conclusion
Knowing how to restore a backup matters whether your site has been defaced by hackers or simply broken by a compatibility issue. There's more than one way to handle it, but manual restoration gives you more control over the process than most automated options.
Related Posts
Backup & Clone
Cloning a WordPress site lets you create an exact copy for testing, migration, backups, or development. This guide explains why site cloning is useful and walks you through the process step by step.
How To Create Custom Elementor Blog Post Template
A well-designed blog page can boost engagement and strengthen your content marketing efforts. With Elementor, you can create a custom blog template from scratch or customize prebuilt layouts to showcase your content in a more attractive and user-friendly way.
Setup & Install
Installing WordPress is a quick and straightforward process that usually takes just a few minutes. Follow these simple steps to set up WordPress on your website and get started with building your site.
How to Enable WordPress Maintenance Mode
Website maintenance mode helps you keep your WordPress site functional and professional while making updates or fixing issues. Learn different methods to enable under-construction mode and ensure a smooth experience for visitors until your site is ready.